设计方案
- 1: 节点内存态统计和计算Node-metrics
- 2: 高性能的序列化和反序列化算法库xxxPack
- 3: 用于Pingmesh直观展现 Pingmesh Heatmap Panel
- 4: 基于eBPF exporter 实现 Kubernetes 和云原生基础设施的可观察性
- 5: 基于Cosign容器镜像签名/验证工具能力,实现Pod可信验证
- 6: 基于节点真实负载情况调度:crane-scheduler-plus
- 7: Pod资源视图隔离
- 8: AI之 模型仓库: model register 开源实现 modelx 2.0
- 9: Kubernetes Pod进程网络带宽 流量控制
- 10: 基于kata direct volume特性, 实现安全容器KataContainer的 CSI block volume直通方案
- 11: Kubernetes Pod进本地磁盘(local,disk,LVM) 进行流量控制
- 12: Kubernetes Namespace 和 Node 做亲和部署
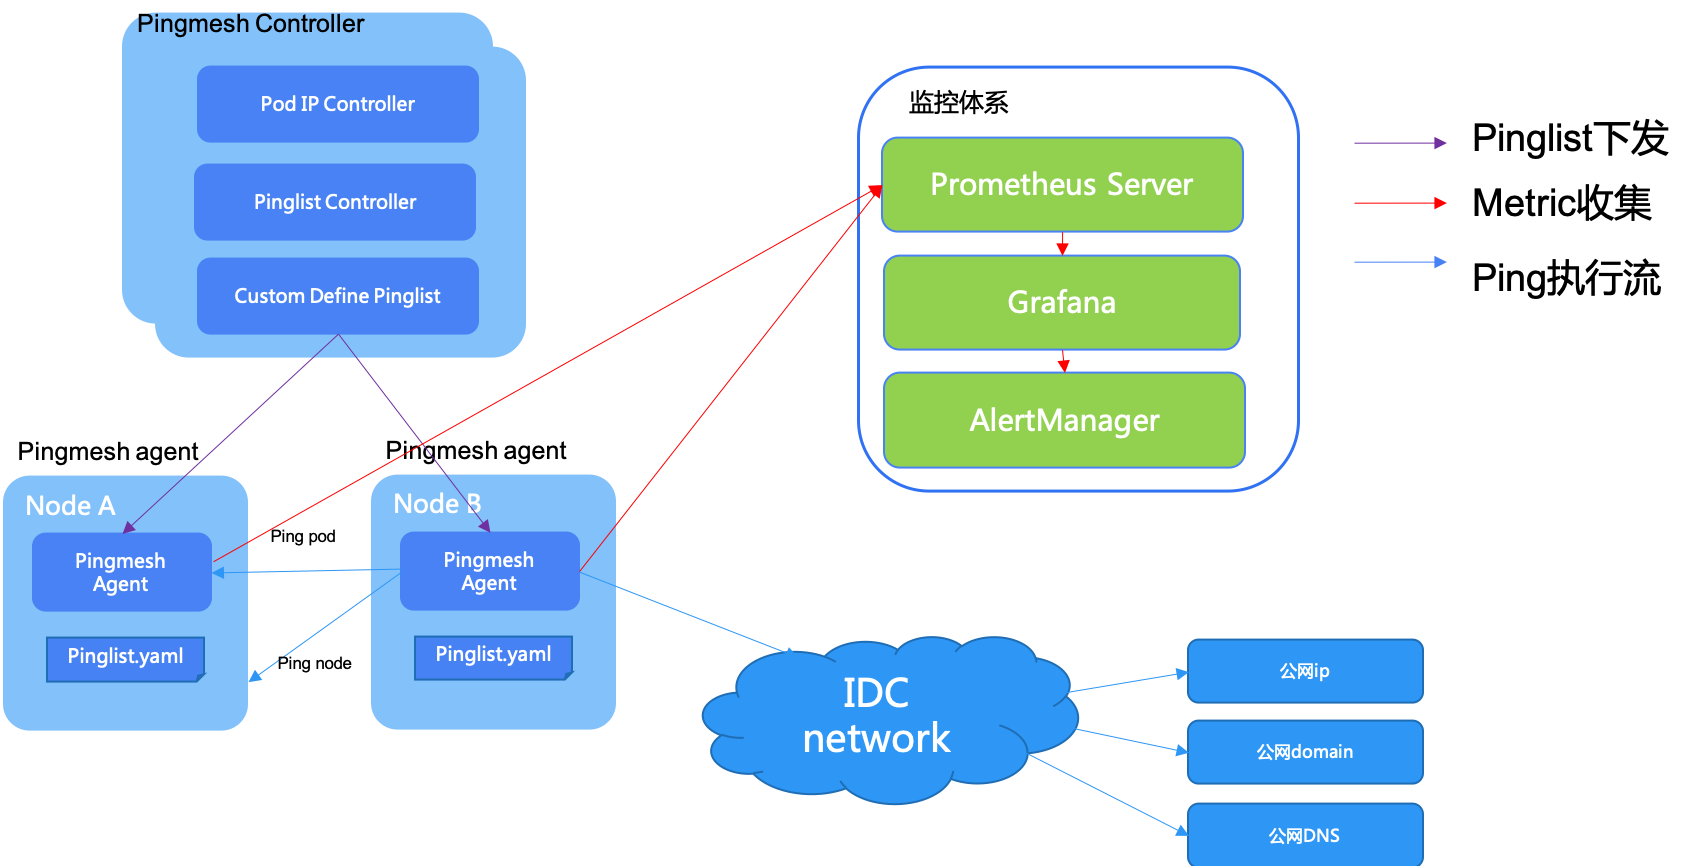
- 13: 基于blackbox构建的Pingmesh体系
- 14: 基于wayne构建的Kubenetes 多集群管理平面 Basa
1 - 节点内存态统计和计算Node-metrics
节点内存态统计和计算agent - Node-metrics
背景
请查看第一篇:https://stack.kubeservice.cn/docs/%E8%AE%BE%E8%AE%A1%E6%96%87%E6%A1%A3/k8s-crane-plus-schduler/
实现
Node Metrics是内存态统计计算模块,实现metrics的avg、min、max 等级的数据聚合查询。
Node Metrics = Node exporter + Prometheus PromSQL
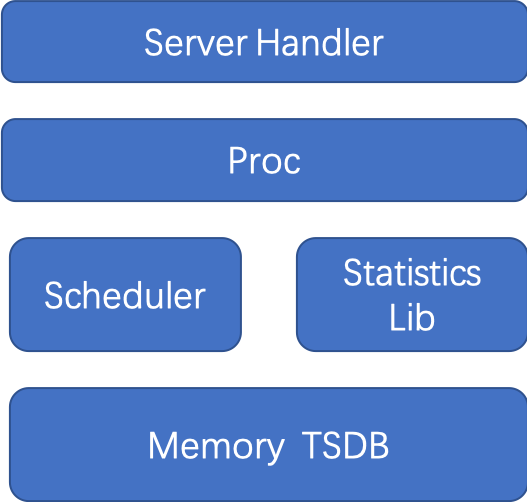
Node Metrics中添加了:
Memory TSDB, 添加轻量内存化内存存储Statistics, 实现通用内存avg、min、max等静态function方法Scheduler, 实现定时采集,数据从proc中采集统一方法Server Handler, 数据通过metrics和statistics方法对外提供
以存储一天数据为例: 每10s存储一次,每次存储cpu、memory和disk 原生数据 3个
整个存储数量为: 也就是 300KB 不到.
(38Byte(float64)+8Byte(time数据)) 24 * 3600/10 = 276480Byte = 270KB
使用
apiVersion: apps/v1
kind: DaemonSet
metadata:
  labels:
    app: node-metrics
  name: node-metrics
  namespace: crane-system
spec:
  selector:
    matchLabels:
      app: node-metrics
  template:
    metadata:
      labels:
        app: node-metrics
    spec:
      containers:
      - image: dongjiang1989/node-metrics:latest
        name: node-metrics
        args:
        - --web.listen-address=0.0.0.0:19101
        resources:
          limits:
            cpu: 102m
            memory: 180Mi
          requests:
            cpu: 102m
            memory: 180Mi
      hostNetwork: true
      hostPID: true
      tolerations:
      - effect: NoSchedule
        key: node-role.kubernetes.io/master
两类接口:
- 接口“/metrics”接口
...
# HELP node_cpu_usage_active cpu usage active.
# TYPE node_cpu_usage_active gauge
node_cpu_usage_active 6.801955214695443
# HELP node_cpu_usage_avg_5m cpu usage avg 5m.
# TYPE node_cpu_usage_avg_5m gauge
node_cpu_usage_avg_5m 6.8018810008297335
# HELP node_cpu_usage_max_avg_1d cpu usage max avg 1d.
# TYPE node_cpu_usage_max_avg_1d gauge
node_cpu_usage_max_avg_1d 6.801955214695443
# HELP node_cpu_usage_max_avg_1h cpu usage max avg 1h.
# TYPE node_cpu_usage_max_avg_1h gauge
node_cpu_usage_max_avg_1h 6.801955214695443
# HELP node_mem_usage_active mem usage active.
# TYPE node_mem_usage_active gauge
node_mem_usage_active 44.272822236553765
# HELP node_mem_usage_avg_5m mem usage avg 5m.
# TYPE node_mem_usage_avg_5m gauge
node_mem_usage_avg_5m 43.68676937682602
# HELP node_mem_usage_max_avg_1d mem usage max avg 1d.
# TYPE node_mem_usage_max_avg_1d gauge
node_mem_usage_max_avg_1d 44.447325557125225
# HELP node_mem_usage_max_avg_1h mem usage max avg 1h.
# TYPE node_mem_usage_max_avg_1h gauge
node_mem_usage_max_avg_1h 44.447325557125225
...
- 接口“/statistics”接口
{
  "cpu_usage_active": 6.801955214695443,
  "cpu_usage_avg_5m": 6.8018810008297335,
  "cpu_usage_max_avg_1d": 6.801955214695443,
  "cpu_usage_max_avg_1h": 6.801955214695443,
  "mem_usage_active": 44.272822236553765,
  "mem_usage_avg_5m": 43.68676937682602,
  "mem_usage_max_avg_1d": 44.447325557125225,
  "mem_usage_max_avg_1h": 44.447325557125225
}
真实使用
线上每一个DaemonSet的node-metrics 占用7MB内存.
以1000个node节点为例子: 7MB*1000 ~= 7GB
比2台32Core 64GB机器节约不少
Source
2 - 高性能的序列化和反序列化算法库xxxPack
对比目前业界高性能库:
- encoding/gob
- encoding/json
- github.com/vmihailenco/msgpack/v5
- labix.org/v2/mgo/bson
- github.com/valyala/fastjson
- github.com/json-iterator/go
- 自研序列化算法
验证数据集合:
type Data struct {
    Name     string
    BirthDay time.Time
    Phone    string
    Siblings int
    Spouse   bool
    Money    float64
    ExInfo   interface{}
}
Benchmark Results
2023-02-09 Results with
Go 1.19.4MacPro Apple M2 8G macOS VenturaDarwin 192.168.1.7 22.2.0 Darwin Kernel Version 22.2.0: Fri Nov 11 02:06:26 PST 2022; root:xnu-8792.61.2~4/RELEASE_ARM64_T8112 arm64
环境下,数据:
goos: darwin
goarch: amd64
pkg: github.com/kubeservice-stack/serialization-benchmarks
cpu: VirtualApple @ 2.50GHz
Benchmark_Bson_Marshal-8         	 2272702	       499.2 ns/op	       110.0 B/serial	     376 B/op	      10 allocs/op
Benchmark_Bson_Unmarshal-8       	 1617357	       716.2 ns/op	       110.0 B/serial	     224 B/op	      19 allocs/op
Benchmark_FastJson_Marshal-8     	 4016576	       296.9 ns/op	       133.8 B/serial	     504 B/op	       6 allocs/op
Benchmark_FastJson_Unmarshal-8   	 1527366	       778.7 ns/op	       133.8 B/serial	    1704 B/op	       9 allocs/op
Benchmark_Gob_Marshal-8          	  467408	      2475 ns/op	       163.6 B/serial	    1616 B/op	      35 allocs/op
Benchmark_Gob_Unmarshal-8        	   95322	     12386 ns/op	       163.6 B/serial	    7688 B/op	     207 allocs/op
Benchmark_JsonIter_Marshal-8     	 1941692	       591.5 ns/op	       148.7 B/serial	     216 B/op	       3 allocs/op
Benchmark_JsonIter_Unmarshal-8   	 1307601	       871.8 ns/op	       148.7 B/serial	     359 B/op	      14 allocs/op
Benchmark_Json_Marshal-8         	 1406618	       850.8 ns/op	       148.6 B/serial	     208 B/op	       2 allocs/op
Benchmark_Json_Unmarshal-8       	  494430	      2153 ns/op	       148.6 B/serial	     399 B/op	       9 allocs/op
Benchmark_xxxPack_Marshal-8      	 3624224	       312.8 ns/op	       119.0 B/serial	     344 B/op	       6 allocs/op
Benchmark_xxxPack_Unmarshal-8    	 2070897	       574.7 ns/op	       119.0 B/serial	     112 B/op	       3 allocs/op
Benchmark_Msgpack_Marshal-8      	 2961548	       401.9 ns/op	        92.00 B/serial	     264 B/op	       4 allocs/op
Benchmark_Msgpack_Unmarshal-8    	 2209035	       536.9 ns/op	        92.00 B/serial	     160 B/op	       4 allocs/op
PASS
ok  	github.com/kubeservice-stack/serialization-benchmarks	23.928s
总结
- xxxPack
一次序列化+一次反序列化,性能最优综合排第1 :574.7 ns/op + 312.8 ns/op = 887.5 ns/op - xxxPack 整体性能是 golang原生json库的 3.38倍 :(2153+850.8)/ 887.5 = 3.3845倍
- xxxPack 每次申请操作平均内存申请大小(119B/serial)排 第3; xxxPack Unmarshal 内存申请最小(112 B/op)排第1
- xxxPack Unmarshal 每次操作申请了内存次数 排第2; Marshal 排第4;
3 - 用于Pingmesh直观展现 Pingmesh Heatmap Panel
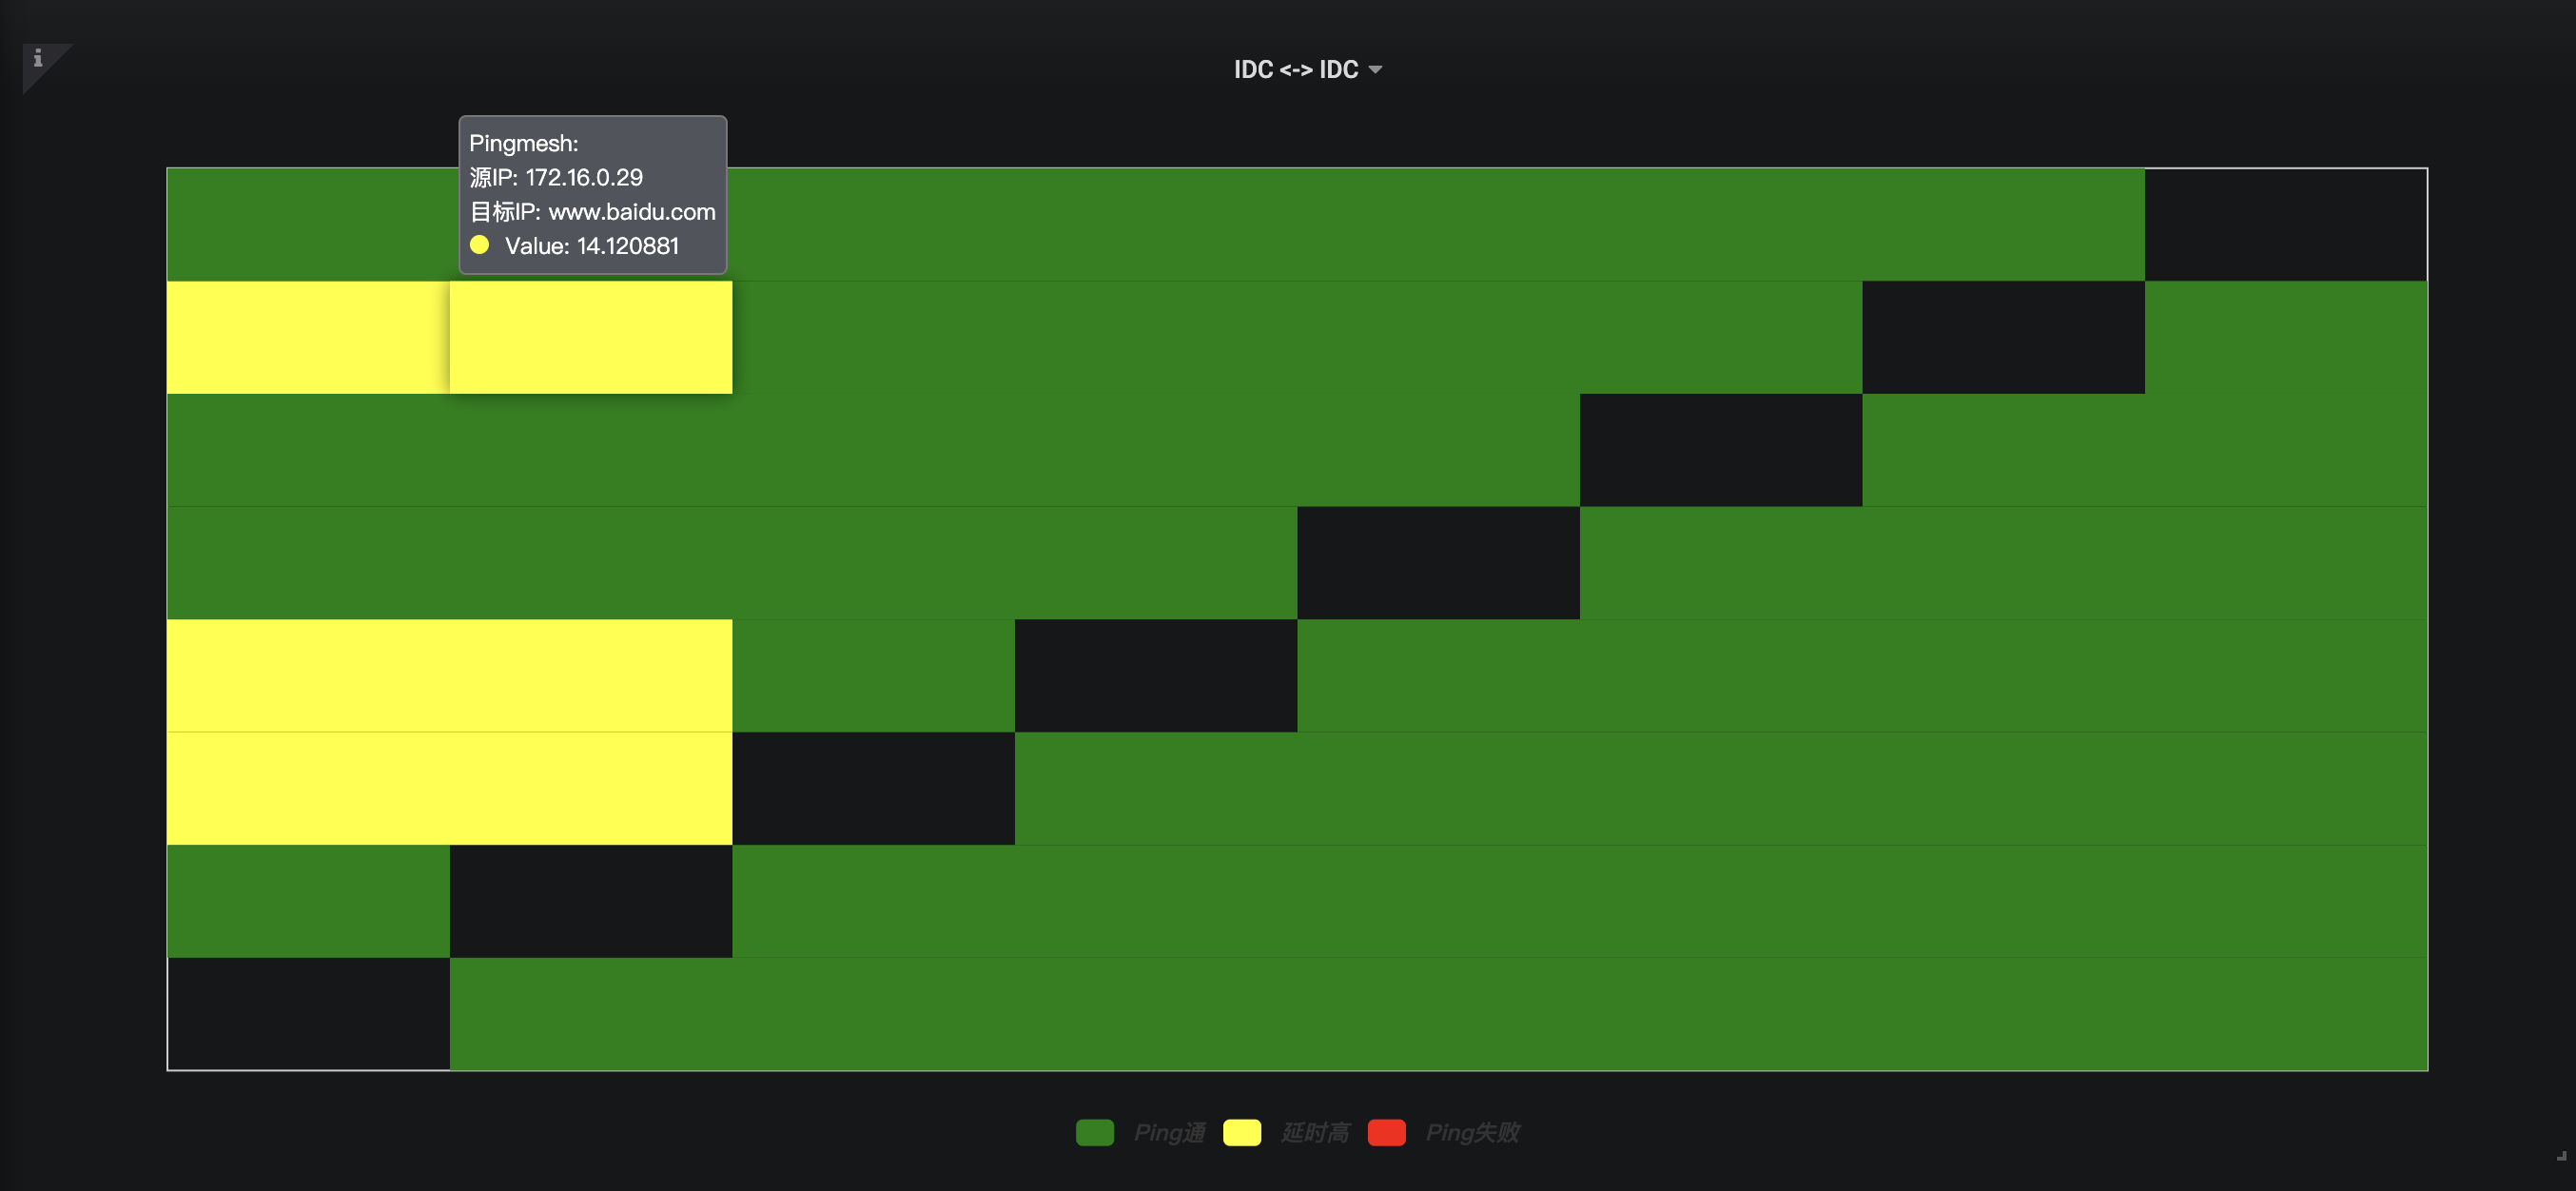
基于baidu Echarts库实现变种 heatmap 图形, 对于 pingmesh 进行二维图形化直观展现
为了Grafana实现此类展现, 通过扩展插件完成
Quick Start
cd pingmesh-heatmap-panel/
yarn install
grunt
安装
cd /var/lib/grafana/plugins
git clone https://github.com/kubeservice-stack/pingmesh-heatmap-panel.git
sudo service grafana-server restart
效果截图
效果图
数据配置
展示效果调整
常见问题
错误诊断
查看grafana 日志
在 mac 日志目录是 /usr/local/var/log/grafana
在 linux 日志目录是 /var/log/grafana
- /var/lib/grafana/plugins/pingmesh-heatmap-panel/*: permission denied , 需要授予插件目录下执行权限:
$ chmod 777 /var/lib/grafana/plugins/pingmesh-heatmap-panel/
grafana > 7.0
参考 Backend plugins: Unsigned external plugins should not be loaded by default #24027
修改grafana配置文件
在mac上一般为 /usr/local/etc/grafana/grafana.ini
在linux上一般为 /etc/grafana/grafana.ini
在[plugins]标签下设置参数
allow_loading_unsigned_plugins = pingmesh-heatmap-panel
开源工程
4 - 基于eBPF exporter 实现 Kubernetes 和云原生基础设施的可观察性
1. Linux系统性能采集
目前对Linux系统进行性能采集:主要有两个exporter
- node_exporter
- cAdvisor
node_exporter 提供有关基础知识的信息,例如按类型细分的 CPU使用、内存使用、磁盘 IO 统计、文件系统和网络使用情况;
cAdvisor提供类似的指标,但深入到容器级别。可以看到哪些容器(和 systemd 单元也是 的容器cAdvisor)使用了多少全局资源,而不是查看总 CPU 使用率。
但这两类监控都是: 应用层 的统计结果,但是如何直观的监控,呈现 Linux内核中的io操作, 就需要用到eBPF解决方案
2. 什么是eBPF?
eBPF是相对 BPF(Berkeley Packet Filter), eBPF (extended BPF) 在为内核追踪Kernel Tracing、应用性能调优/监控、流控Traffic Control等
本身eBPF已经包含在 Linux 内核中包含了。需要在内核中运行的低开销沙盒用户定义字节码, 需要符合eBPF规范.
规范要求:
- 低开销: 否则我们不能在生产中运行它;
- 通用的: 不会仅仅局限于 io tracing;
- 开箱即用: 第三方内核模块和补丁不太实用;
- 安全: 不能以崩溃为代价,来获得一些指标;
- CO-RE: 一次编译,在不同内核版本上都可以使用;
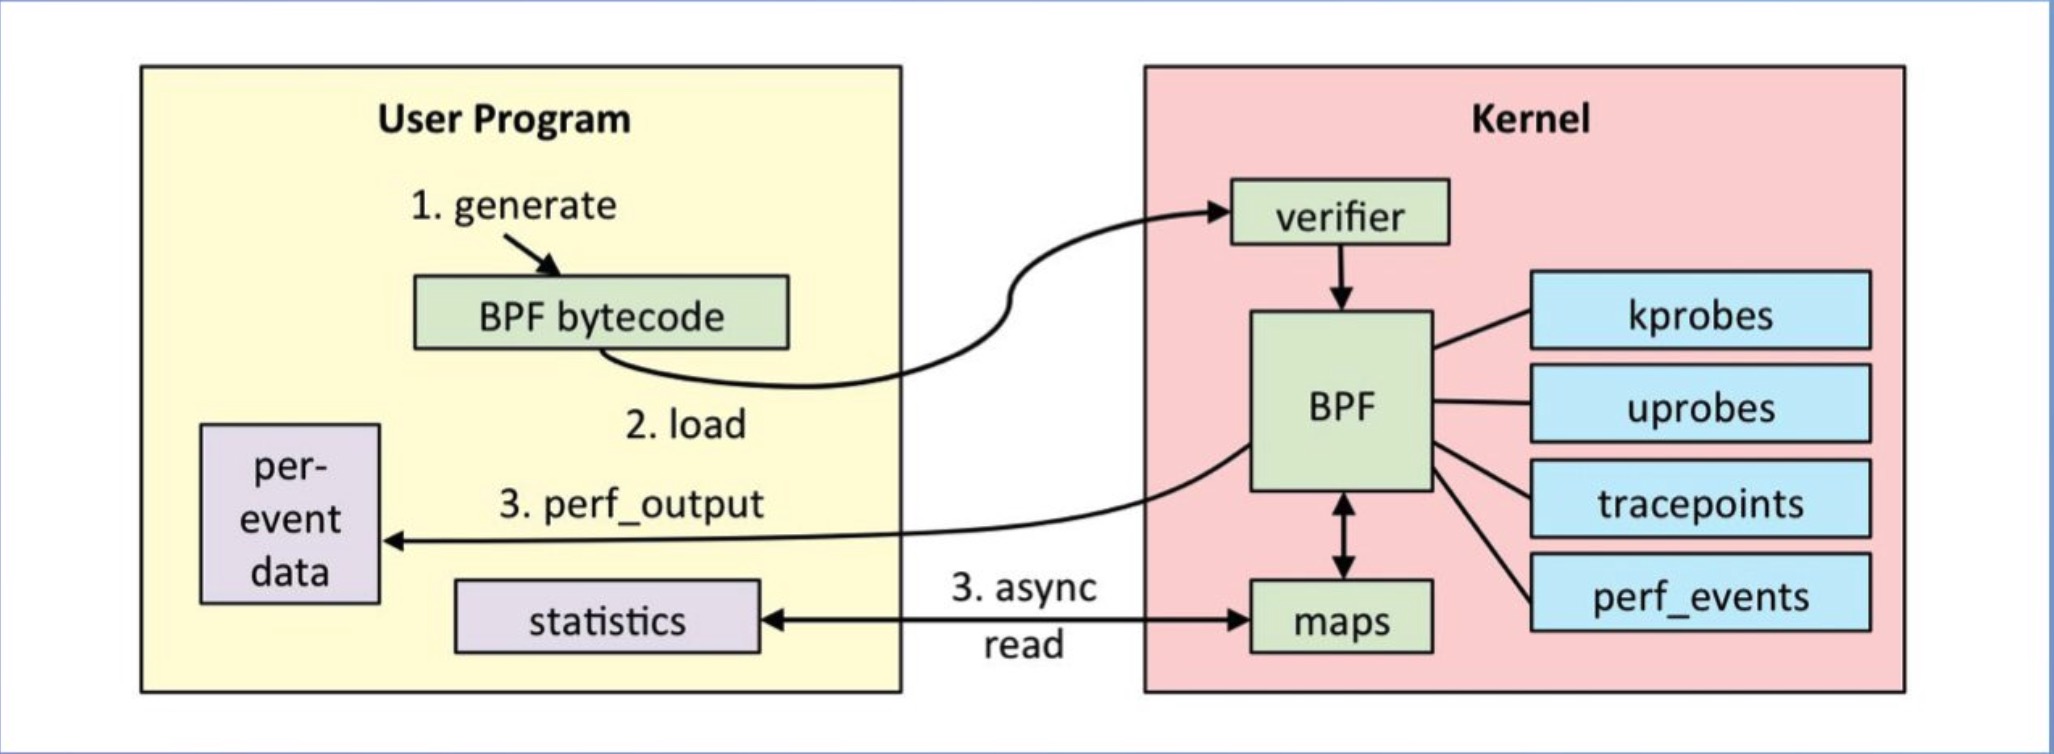
通过c语言编写eBPF程序,然后通过clang/llvm编译器,将BPF程序编译为BPF字节码。然后通过bpf系统调用,将BPF字节码注入到内核中,在注入的时候,我们必须要进过BPF程序的验证,来保证我们写的BPF程序没有问题,以防干掉我们的系统。然后,在判断是否开启了JIT,然后开启了,还需要将BPF字节码编译为本机机器码,以加快运行速度。
当我们BPF程序attach的事件触发了,就会执行我们的BPF程序,然如是经过JIT编译过后的就能够直接执行,然后没有开启JIT就需要通过虚拟机进行解析在执行。在执行BPF程序的过程中,会将需要保存的数据存储到map空间中,用户时候可以从map空间读取出数据。
BPF是基于事件触发的。
比如: eBPF程序attach到kprobe类型的事件上,这个kprobe事件是个函数,当cpu执行到这个函数的时候,就会触发。然后就会执行我们的BPF程序。
3. ebpf_exporter 代码分析
使用 YAML 文件进行配置,可自定义eBPF要提取的系统数据,配置文件主要包括三个部分:
- prometheus可识别的特定格式的数据;
- 附加到BPF程序的探针;
- 要执行的BPF程序。
3.1 配置文件
timer.yaml 定义指标名称和labels信息
metrics:
  counters:
    - name: timer_starts_total
      help: Timers fired in the kernel
      labels:
        - name: function
          size: 8
          decoders:
            - name: ksym
timer.bpf.c
#include <vmlinux.h>
#include <bpf/bpf_helpers.h>
#include "maps.bpf.h"

struct {
    __uint(type, BPF_MAP_TYPE_HASH);
    __uint(max_entries, 1024);
    __type(key, u64);
    __type(value, u64);
} timer_starts_total SEC(".maps");

SEC("tracepoint/timer/timer_start") // 使用tracepoint跟踪timer_start,其中,跟踪点是timer:timer_start
int do_count(struct trace_event_raw_timer_start* ctx)
{
    u64 function = (u64) ctx->function;

    increment_map(&timer_starts_total, &function, 1);

    return 0;
}

char LICENSE[] SEC("license") = "GPL"; // 内核要求必须是GPL license
3.2 配置代码分析
metrics:
  counters:
    - name: timer_starts_total
      help: Timers fired in the kernel
      labels:
        - name: function
          size: 8
          decoders:
            - name: ksym
timer.yaml中定义了一个名为timers的程序。定义了一个名为timer_start_total的指标,用于对系统中计时器的使用次数进行计数。定义了一个名为function的标签,用来向prometheus提供调用了计时器的函数名,指定了转换函数为ksym。
SEC("tracepoint/timer/timer_start") // 使用tracepoint跟踪timer_start,其中,跟踪点是timer:timer_start
SEC("tracepoint/timer/timer_start") 定义了使用tracepoint跟踪timer_start,其中,跟踪点是timer:timer_start,这个在内核/sys/kernel/debug/tracing/events/timer中可以找到
第三部分 需要执行BPF程序片段
int do_count(struct trace_event_raw_timer_start* ctx)
{
    u64 function = (u64) ctx->function;

    increment_map(&timer_starts_total, &function, 1);

    return 0;
}
4. eBPF exporter支持hook点
| Hook Point | 功能 | 描述 |
|---|---|---|
| timers | 统计系统中启动计时器的次数 | |
| uprobe | bbp k/uprobe 计数统计 | |
| shrinklat | 磁盘刷新脏页统计直方图 | |
| usdt | USDT 探针 | |
| oomkill | 跟踪 OOMKill内核统计次数 | kernel 5.x 版本以上支持 |
| biolatency | 将块设备 I/O 延迟统计直方图 | |
| accept-latency | Trace TCP accepts延时直方图 | |
| bpf-jit | bpf prog JIT 次数 | |
| cachestat | 计数缓存内核函数调用统计 | |
| cgroup | BPF 程序的检查和简单操作 | |
| llcstat | 按 PID 汇总缓存引用和缓存未命中 | |
| raw-tracepoints | 原始tracepoints统计 | |
| tcp-syn-backlog | TCP SYN backlog | |
| tcp-window-clamps | 测量 tcp 拥塞控制状态持续时间 |
5. 适配低版本内核
对于 Kerenl高版本 5.x 到目前的 6.x, 都满足功能.
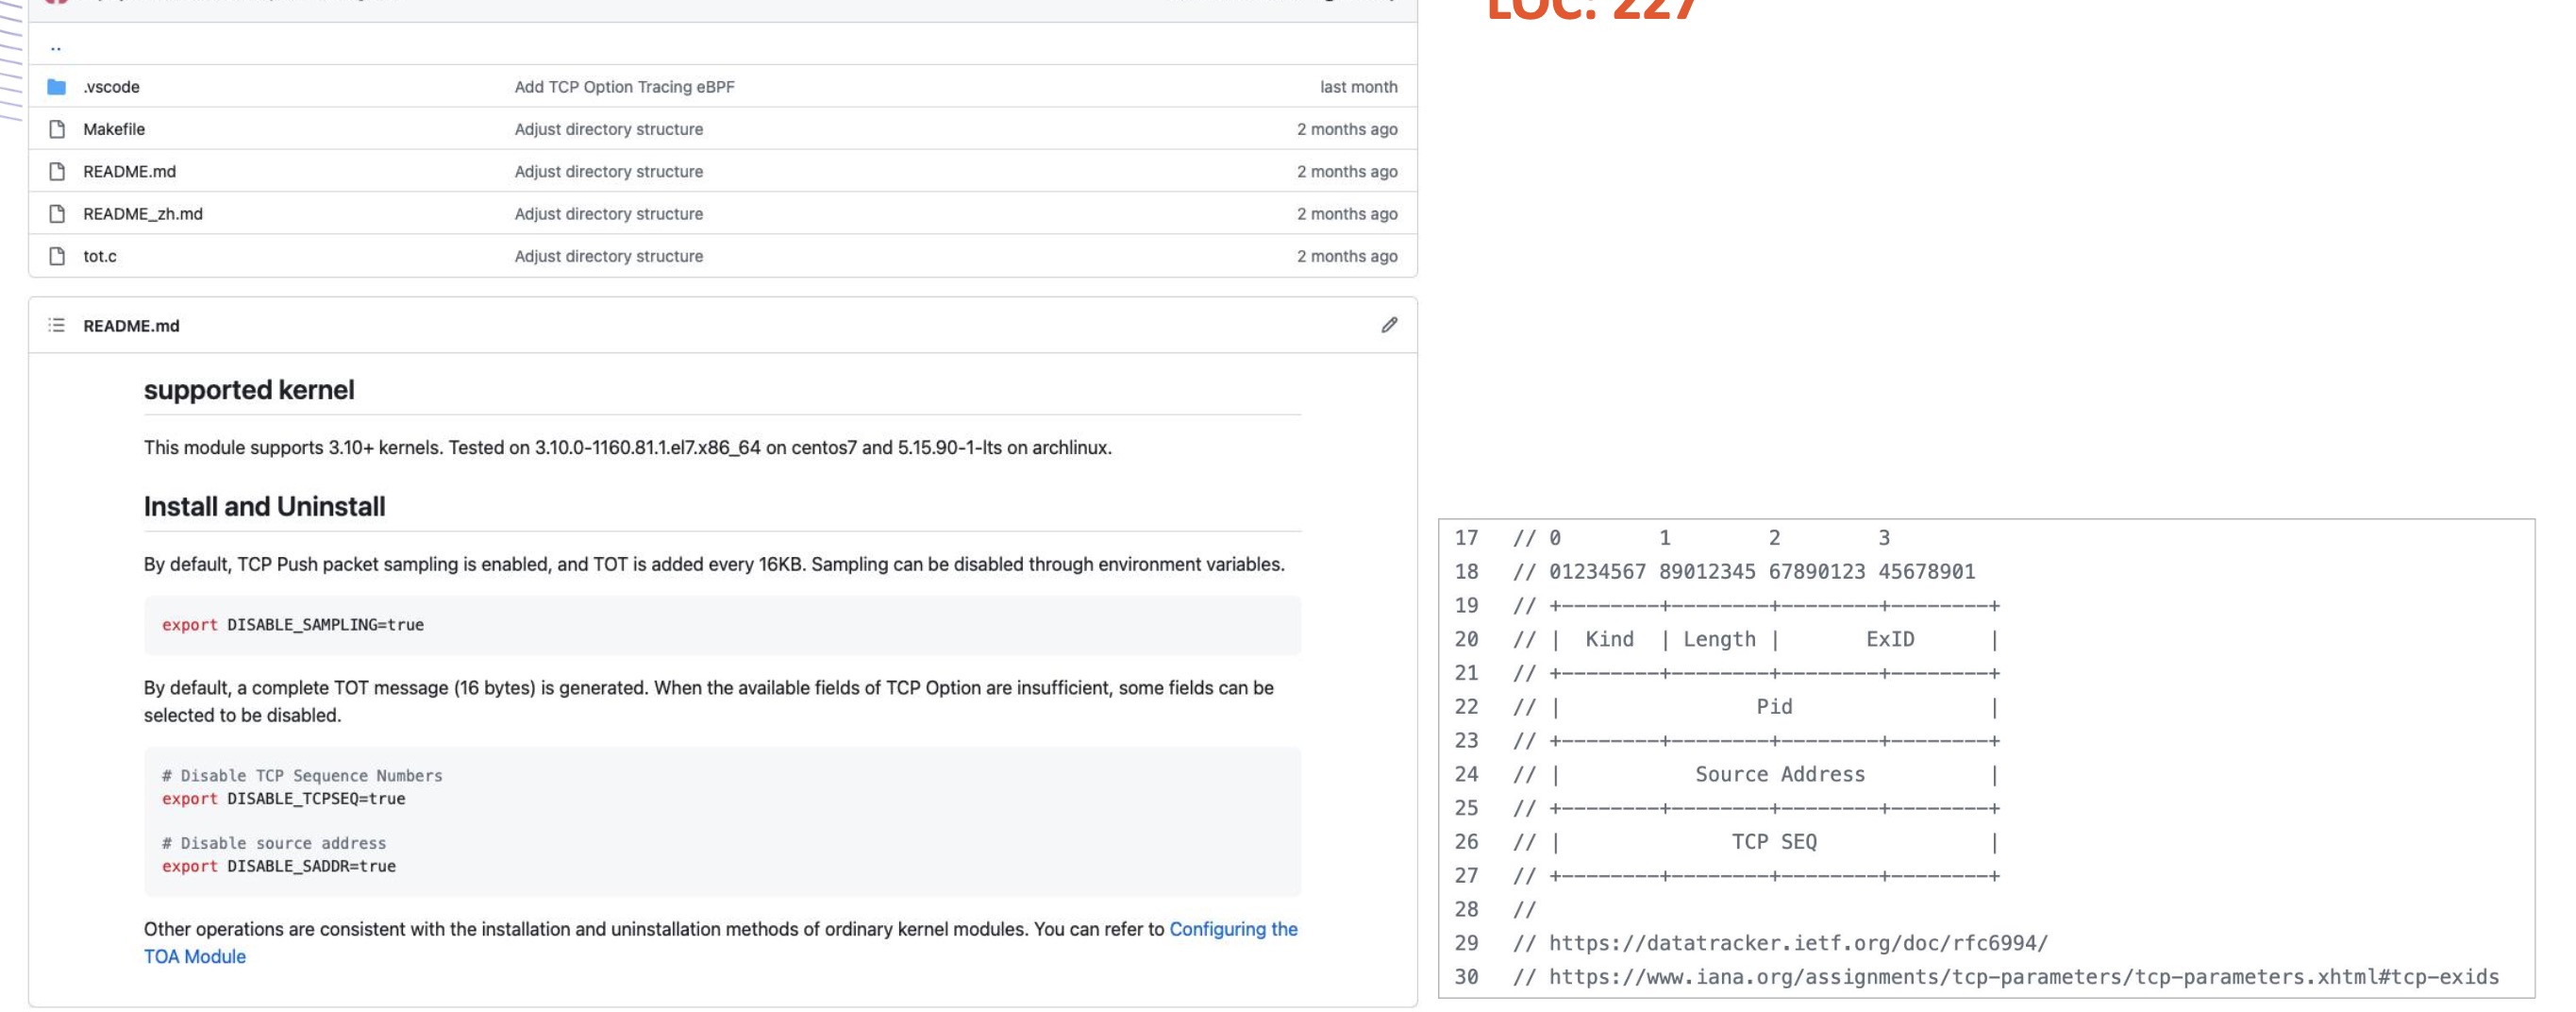
对于 Kerenl3.10+ 需要安装部署tot(TCP Option Tracing)插件暴露接
6. 依赖要求
- BCC 迁移到 libbpf 1.1.0: https://github.com/iovisor/bcc/tree/master/libbpf-tools
- Kernel 要求 4.15+
7. 部署
7.1 ebpf exporter 安装
helm 方式部署: 支持arm64和amd64环境 https://artifacthub.io/packages/helm/kubservice-charts/kubeservice-ebpf-exporter
7.2 grafana 监控
grafana dashboard:https://grafana.com/grafana/dashboards/18612-kernel-ebpf-hook/


8. 其他来源
5 - 基于Cosign容器镜像签名/验证工具能力,实现Pod可信验证
腾讯云TKE集群,在23年5月,上线了一特性: Cerberus 组件支持对签名镜像进行可信验证
支持在Kubernetes集群中只部署可信授权方签名的容器镜像,降低在容器环境中的镜像安全风险。
因此,cosign-webhook, 功能上类似腾讯Cerberus. 为了实现一套多云可用,并支持Docker hub、Harbor和Quay镜像仓库 签名sig 存储的通用解决方案
背景:Cosign 工具
[Cosign](https://github.com/sigstore/cosign) 是 谷歌开源容器镜像的签名和验证工具。 此二进制工具支持 容器镜像 签名与验证。并继承到谷歌内部容器基础设施distroless中。
Cosign 除了提供给用户可以方便的对镜像签名和验证,还提供免费 OIDC PKI (Fucio) 和内置二进制透明度和时间戳服务 Rekor, 来托管签名和验证过程中的公钥和私钥
cosign基本使用
1. 签名:cosign keyless模式,签名证书托管在googleapi open OIDC PKI 上
以Dockerhub上的dongjiang1989/node-metrics:latest镜像为例:
因为,是keyless模式,直接行cosign sign <image>@sha256:<digest>
dongjiang@MacBook Pro:~ $  cosign sign dongjiang1989/node-metrics@sha256:c1aa0f2861d2eb744efb8f82a1d7d5f1b74919d1cc6501e799daeac1991fc282
Generating ephemeral keys...
Retrieving signed certificate...

	The sigstore service, hosted by sigstore a Series of LF Projects, LLC, is provided pursuant to the Hosted Project Tools Terms of Use, available at https://lfprojects.org/policies/hosted-project-tools-terms-of-use/.
	Note that if your submission includes personal data associated with this signed artifact, it will be part of an immutable record.
	This may include the email address associated with the account with which you authenticate your contractual Agreement.
	This information will be used for signing this artifact and will be stored in public transparency logs and cannot be removed later, and is subject to the Immutable Record notice at https://lfprojects.org/policies/hosted-project-tools-immutable-records/.

By typing 'y', you attest that (1) you are not submitting the personal data of any other person; and (2) you understand and agree to the statement and the Agreement terms at the URLs listed above.
Are you sure you would like to continue? [y/N] y
error opening browser: exec: "xdg-open": executable file not found in $PATH
Go to the following link in a browser:

	 https://oauth2.sigstore.dev/auth/auth?access_type=online&client_id=sigstore&code_challenge=L_clEcpY7BXtgaJ0W5qZJq74ovXNnznXpwYluzCUPEQ&code_challenge_method=S256&nonce=2TSKHjXGVJMxbj4TgFNe6wtXXKg&redirect_uri=urn%3Aietf%3Awg%3Aoauth%3A2.0%3Aoob&response_type=code&scope=openid+email&state=2TSKHg5tyauZ3PaaVJHyNfRAf1D
Enter verification code: yql4si3wqdvkzrm25ohncuk45

Successfully verified SCT...
tlog entry created with index: 29886419
Pushing signature to: index.docker.io/dongjiang1989/node-metrics
执行期间会跳转到到 https://oauth2.sigstore.dev/auth/auth?xxx 连接 需要用github 或者 google 或者 microsoft 统一登入,验证邮箱, 并在平台上保留公钥和私钥.
完成验证后,会将signature文件,提交到镜像仓库
2. 验证:cosign keyless模式
keyless模式,直接通过:
cosign verify --certificate-identity <keyless邮箱地址> --certificate-oidc-issuer <认证平台地址> <image>@sha256:<digest>
其中,认证平台地址根据sign in平台,不通进行设置
- github认证: https://github.com/login/oauth
- google认证: https://accounts.google.com
- 微软认证:https://login.microsoftonline.com
dongjiang@MacBook Pro:~ $ cosign verify --certificate-identity dongjiang1989@126.com --certificate-oidc-issuer https://github.com/login/oauth dongjiang1989/node-metrics@sha256:c1aa0f2861d2eb744efb8f82a1d7d5f1b74919d1cc6501e799daeac1991fc282

Verification for index.docker.io/dongjiang1989/node-metrics@sha256:c1aa0f2861d2eb744efb8f82a1d7d5f1b74919d1cc6501e799daeac1991fc282 --
The following checks were performed on each of these signatures:
  - The cosign claims were validated
  - Existence of the claims in the transparency log was verified offline
  - The code-signing certificate was verified using trusted certificate authority certificates

[{"critical":{"identity":{"docker-reference":"index.docker.io/dongjiang1989/node-metrics"},"image":{"docker-manifest-digest":"sha256:c1aa0f2861d2eb744efb8f82a1d7d5f1b74919d1cc6501e799daeac1991fc282"},"type":"cosign container image signature"},"optional":{"1.3.6.1.4.1.57264.1.1":"https://github.com/login/oauth","Bundle":{"SignedEntryTimestamp":"xxxxxxxxx","Payload":{"body":"xxxxxxxxxxxx=","integratedTime":1691030975,"logIndex":29886419,"logID":"c0d23d6ad406973f9559f3ba2d1ca01f84147d8ffc5b8445c224f98b9591801d"}},"Issuer":"https://github.com/login/oauth","Subject":"dongjiang1989@126.com"}}]
3. 本地key方式签名和验证
a. 先创建创建密钥对
dongjiang@MacBook Pro:~ $ cosign generate-key-pair
Enter password for private key:
Enter password for private key again:
Private key written to cosign.key
Public key written to cosign.pub
dongjiang@MacBook Pro:~ $ ls
aaa  cosign.key  cosign.pub  go  src  tools
b. 通过cosign.key, 镜行容器镜行签名 cosign sign --key cosign.key <image>@sha256:<digest>
dongjiang@MacBook Pro:~ $ cosign sign --key cosign.key dongjiang1989/node-metrics:sha256:c1aa0f2861d2eb744efb8f82a1d7d5f1b74919d1cc6501e799daeac1991fc282
Enter password for private key:
Error: signing [dongjiang1989/node-metrics:sha256:c1aa0f2861d2eb744efb8f82a1d7d5f1b74919d1cc6501e799daeac1991fc282]: parsing reference: could not parse reference: dongjiang1989/node-metrics:sha256:c1aa0f2861d2eb744efb8f82a1d7d5f1b74919d1cc6501e799daeac1991fc282
main.go:74: error during command execution: signing [dongjiang1989/node-metrics:sha256:c1aa0f2861d2eb744efb8f82a1d7d5f1b74919d1cc6501e799daeac1991fc282]: parsing reference: could not parse reference: dongjiang1989/node-metrics:sha256:c1aa0f2861d2eb744efb8f82a1d7d5f1b74919d1cc6501e799daeac1991fc282
[root@VM-0-5-centos ~]# cosign sign --key cosign.key dongjiang1989/node-metrics@sha256:c1aa0f2861d2eb744efb8f82a1d7d5f1b74919d1cc6501e799daeac1991fc282
Enter password for private key:

	The sigstore service, hosted by sigstore a Series of LF Projects, LLC, is provided pursuant to the Hosted Project Tools Terms of Use, available at https://lfprojects.org/policies/hosted-project-tools-terms-of-use/.
	Note that if your submission includes personal data associated with this signed artifact, it will be part of an immutable record.
	This may include the email address associated with the account with which you authenticate your contractual Agreement.
	This information will be used for signing this artifact and will be stored in public transparency logs and cannot be removed later, and is subject to the Immutable Record notice at https://lfprojects.org/policies/hosted-project-tools-immutable-records/.

By typing 'y', you attest that (1) you are not submitting the personal data of any other person; and (2) you understand and agree to the statement and the Agreement terms at the URLs listed above.
Are you sure you would like to continue? [y/N] y
tlog entry created with index: 29887689
Pushing signature to: index.docker.io/dongjiang1989/node-metrics
c. 通过cosign.pub, 镜行容器镜行验证 cosign verify --key cosign.pub <image>@sha256:<digest>
[root@VM-0-5-centos ~]# cosign verify --key cosign.pub dongjiang1989/node-metrics@sha256:c1aa0f2861d2eb744efb8f82a1d7d5f1b74919d1cc6501e799daeac1991fc282

Verification for index.docker.io/dongjiang1989/node-metrics@sha256:c1aa0f2861d2eb744efb8f82a1d7d5f1b74919d1cc6501e799daeac1991fc282 --
The following checks were performed on each of these signatures:
  - The cosign claims were validated
  - Existence of the claims in the transparency log was verified offline
  - The signatures were verified against the specified public key

[{"critical":{"identity":{"docker-reference":"index.docker.io/dongjiang1989/node-metrics"},"image":{"docker-manifest-digest":"sha256:c1aa0f2861d2eb744efb8f82a1d7d5f1b74919d1cc6501e799daeac1991fc282"},"type":"cosign container image signature"},"optional":{"Bundle":{"SignedEntryTimestamp":"xxxxxxxxxx","Payload":{"body":"xxxxxxxxxx=","integratedTime":1691032440,"logIndex":29887689,"logID":"c0d23d6ad406973f9559f3ba2d1ca01f84147d8ffc5b8445c224f98b9591801d"}}}}]
由于国内对国外google,github访问限制,使用本地签名方式更有利于与私有化 和 跨云验证
具体实现方式
先通过 CRD 描述 namespace 下 CosignKey 扩展限制
设计如下:
apiVersion: cosignkey.kubeservice.cn/v1
kind: CustomCosignKey
metadata:
  name: test-cosignkey
  namespace: xxxxx
spec:
  authorities:
    key:
    - |
          -----BEGIN PUBLIC KEY-----
          ......
          -----END PUBLIC KEY-----
在namespace 可以是添加label设置 cosignkey.kubernetes.io/verify : disabled, 可支持 ignore namespace下Cosign验证
注意
- 只有
namespace添加label设置cosignkey.kubernetes.io/verify : enabled且namespaceCustomCosignKey被定义, 才生效 - 同一个
namespaceCRD 只能背定义一次,重复定义出错; - 会对pod中的 initContainer、Container 都会进行验证;
1.为什么CRD需要说明支持多个key?
一个namespace(属于1个租户),他部署的pod中的容器,可能有几个来源。 这几个来源的public key可能不通,支持轮训检查
2.配置namespace label flag 作用?
用于 功能上线,持续替换 或者 特殊场景下排ta处理
周边生态
- Harbor 直接镜像同步 支持 cosign 签名和验证:https://github.com/goharbor/harbor/releases/tag/v2.5.0
- Skopeo 镜像迁移工具 支持 cosign 镜像迁移: https://github.com/containers/skopeo/pull/1849
- KMS: aws、google 和 azure kms都支持 cosign 容器验证
source
https://github.com/kubeservice-stack/cosign-webhook
其他
6 - 基于节点真实负载情况调度:crane-scheduler-plus
crane-scheduler 解决了Kubernetes仅仅基于资源的 resource request 进行调度,然而 Pod 的真实资源使用率 real-used,往往与其所申请资源的 request/limit 差异很大,这直接导致了集群负载不均, 跟严重者会导致节点Pod被驱逐
通常遇到的现象:
-
1.集群中的部分节点,资源的真实使用率远低于 resource request,却没有被调度更多的 Pod,这造成了比较大的资源浪费;
-
2.而集群中的另外一些节点,其资源的真实使用率事实上已经过载,却无法为调度器所感知到,这极大可能影响到业务的稳定性;
与上云的最初目的相悖,为业务投入了足够的资源,却没有达到理想的效果。
1. 原生crane-scheduler
Crane-scheduler 基于集群的真实负载数据构造了一个简单却有效的模型,作用于调度过程中的 Filter 与 Score 阶段,并提供了一种灵活的调度策略配置方式,从而有效缓解了 kubernetes 集群中各种资源的负载不均问题。换句话说,Crane-scheduler 着力于调度层面,让集群资源使用最大化的同时排除了稳定性的后顾之忧,真正实现「降本增效」
Crane-Scheduler 与社区同类型的调度器最大的区别之一:
- 前者提供了一个泛化的调度策略配置接口,给予了用户极大的灵活性;
- 后者往往只能支持 cpu/memory 等少数几种指标的感知调度,且指标聚合方式,打分策略均受限。
在 Crane-scheduler 中,用户可以为候选节点配置任意的评价指标类型(只要从 Prometheus 能拉到相关数据),不论是常用到的 CPU/Memory 使用率,还是 IO、Network Bandwidth 或者 GPU 使用率,均可以生效,并且支持相关策略的自定义配置。
2. 正式使用中的问题
- 问题一:当
Kubernetes节点中Node节点过于庞大时,Prometheus资源消耗会是一个很大开销!1000个Node节点,Prometheus基本需要32core 64G的 至少2个node部署HA版本; 并且还有Prometheus周边的一堆东西:Operator、ServiceMonitor、CRD等一堆东西 - 问题二:
Prometheus从旁路监控(offline系统),变成(online系统), 降低整个体系稳定性;
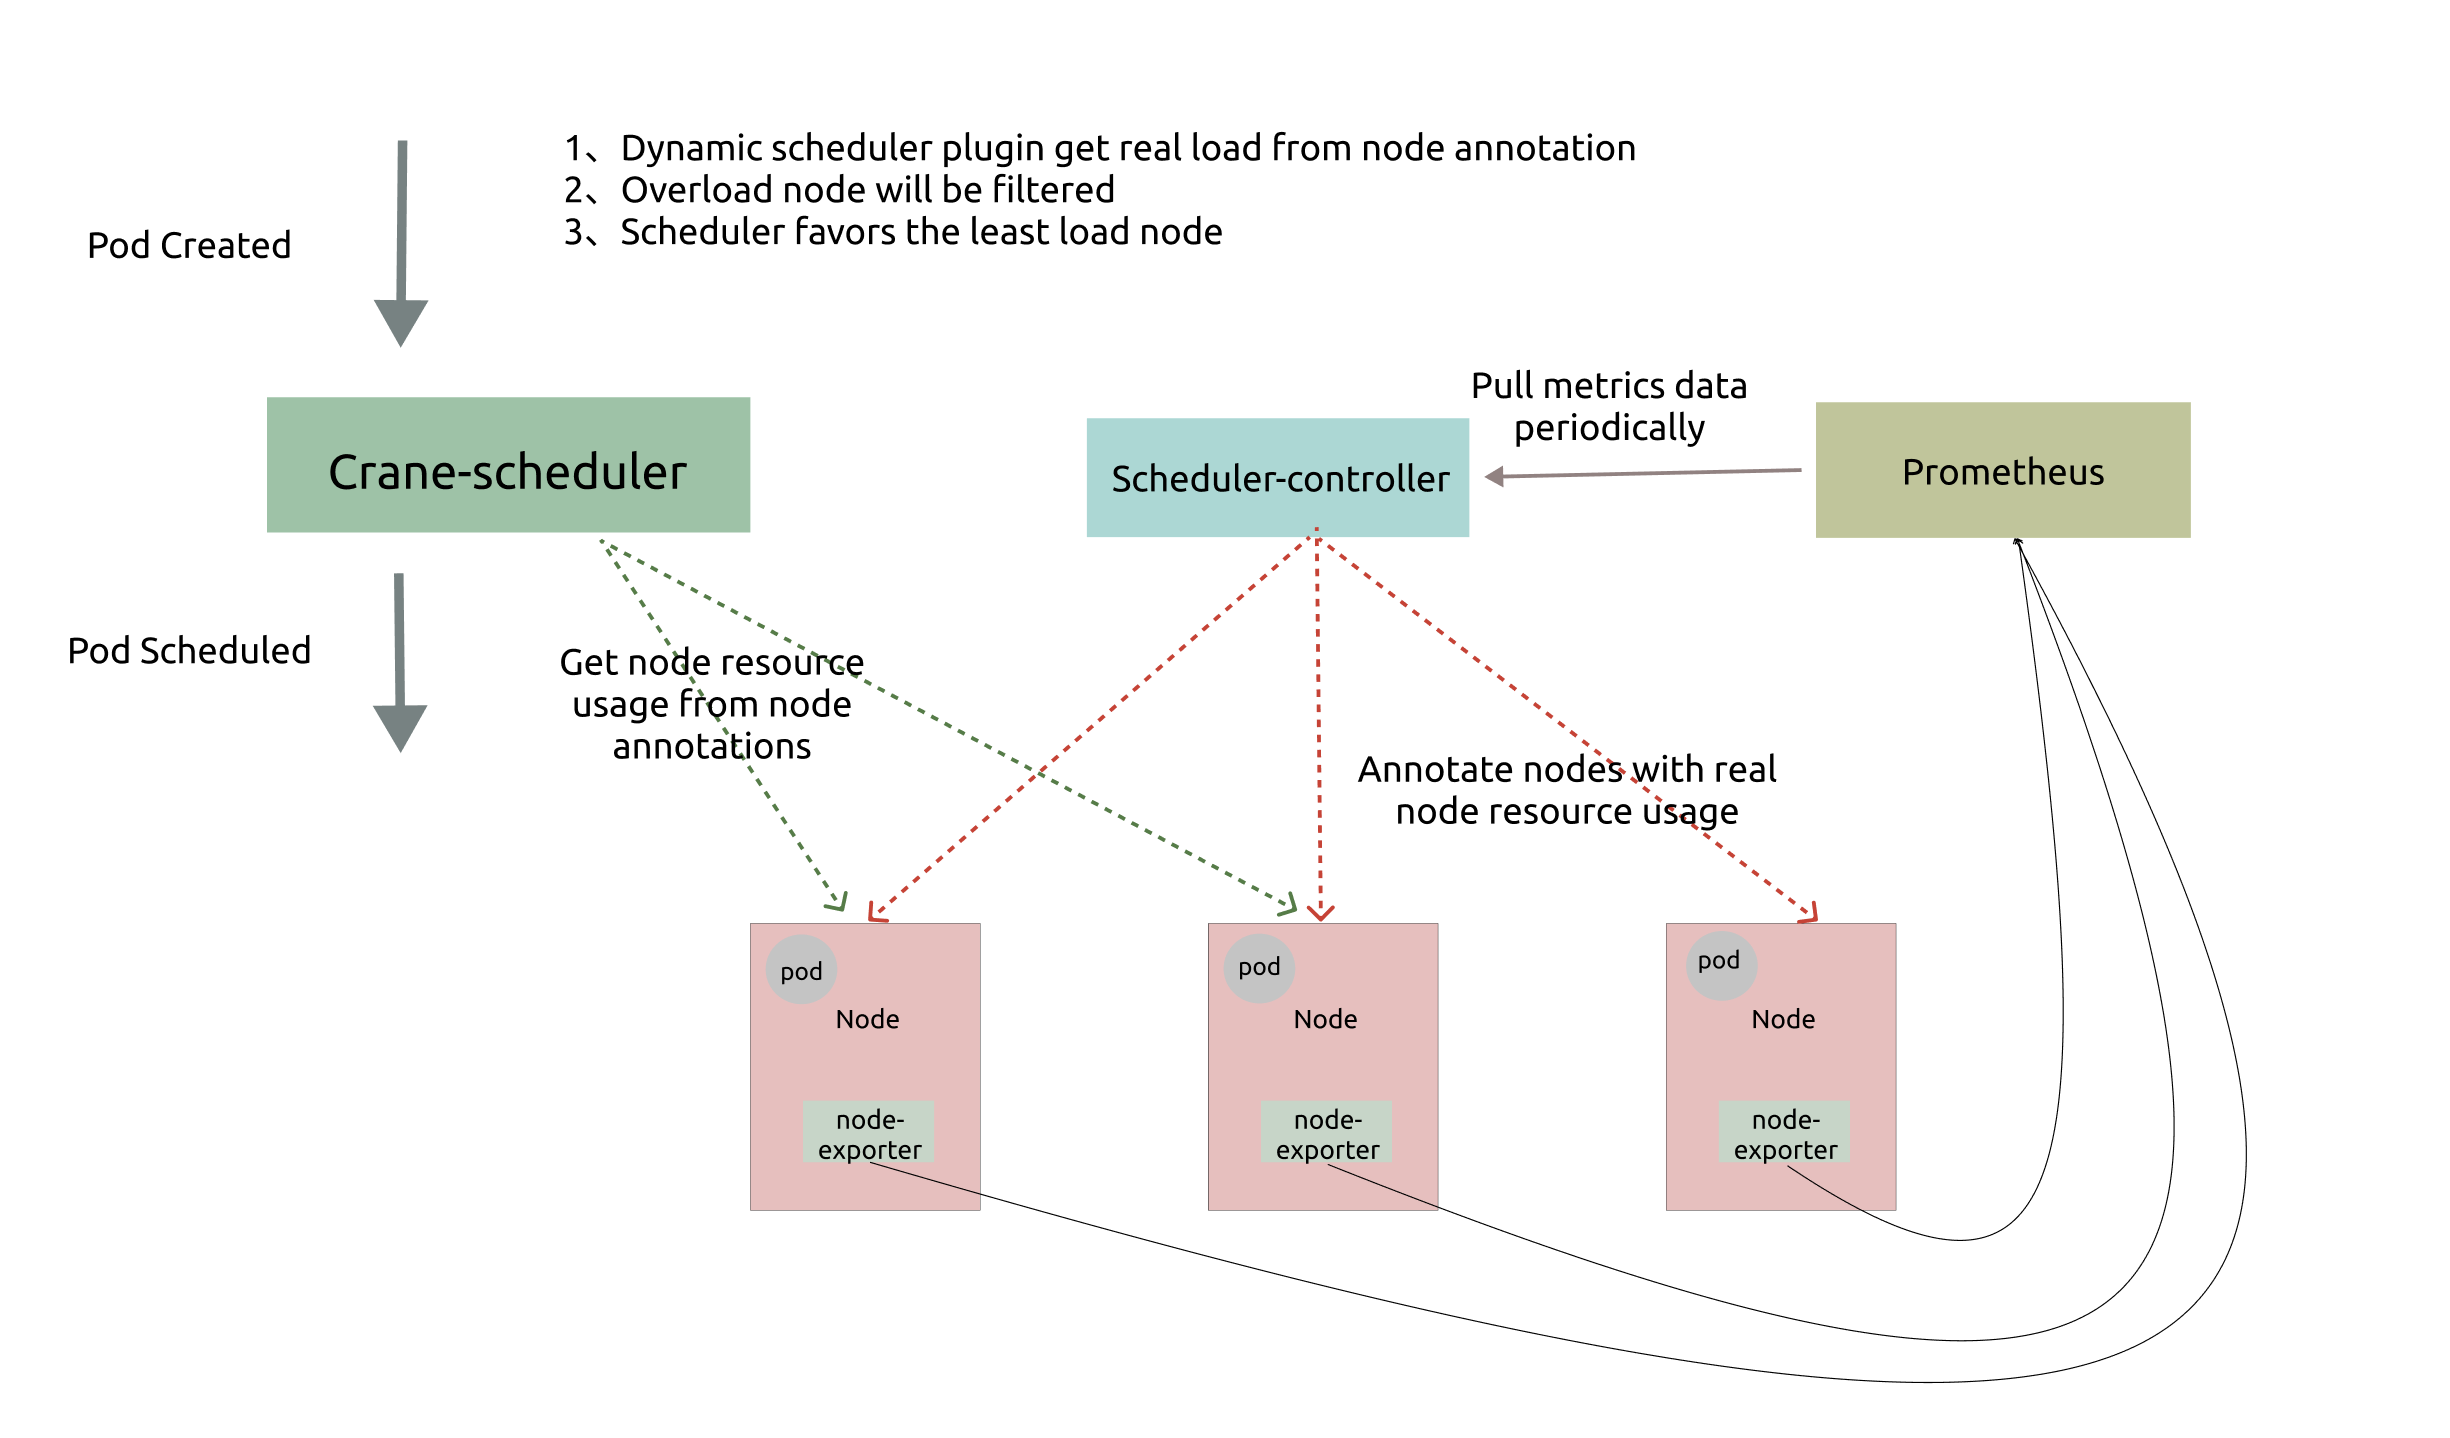
基于以上问题,对现有的 scheduler-controller 进行增强:
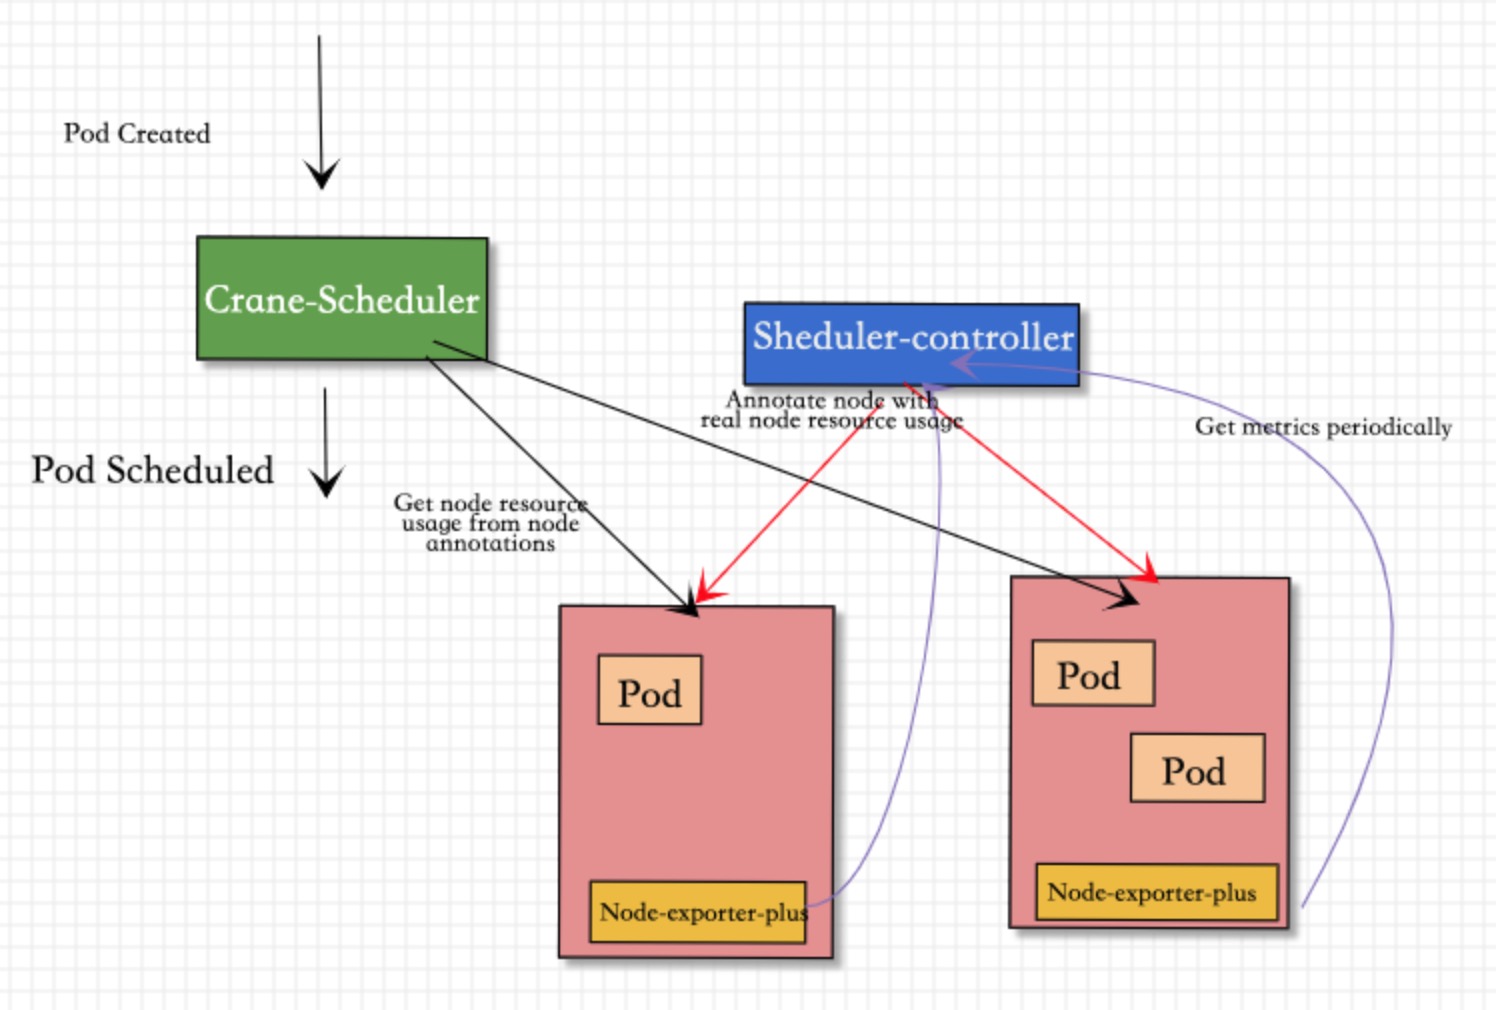
去掉Prometheus的依赖,并对node-exporter-plus进行增强,支持内存计算;直接通过 scheduler-controller 轮询方式 node-exporter-plus 并将指标添加到 node annotations
如上图所示,Crane-scheduler-plus 仅依赖 Node-exporter-plus 组件.
-
Scheduler-Controller会周期性轮训到Node-exporter-plus真实负载数据, 再以Annotation的形式标记在各个节点上; -
Scheduler则直接在从候选节点的Annotation读取负载信息,并基于这些负载信息在Filter阶段对节点进行过滤以及在Score阶段对节点进行打分; -
Node-exporter-plus会更加配置 在内存中计算好各类指标, 比如:cpu_usage_avg_5m、cpu_usage_max_avg_1h、mem_usage_avg_5m、mem_usage_max_avg_1h等,通过metrics的gauge指标方式暴露出去
基于上述架构,最终实现了基于真实负载对 Pod 进行有效调度。
并且对Scheduler-Controller过载保护:
-
- 如果通过
endpoints来访问的node节点过多, 在一个周期(比如15s)处理不完, 会保证本次处理完成后,在执行下一次, 优先一个轮回完成
- 如果通过
-
- metrics中是通过
Promethrus Gauge, 在每个周期中单独计算, 保证即使网络异常丢失 pull 请求,也可以通过下一次请求进行补足
- metrics中是通过
3. 设计方式
3.1 Scheduler-Controller 变化
将PromClient 拉取 方式变更为 ClientSet 请求 service endpoints方式 获得各个结果metrics数据
type PromClient interface {
	// QueryByNodeIP queries data by node IP.
	QueryByNodeIP(string, string) (string, error)
	// QueryByNodeName queries data by node IP.
	QueryByNodeName(string, string) (string, error)
	// QueryByNodeIPWithOffset queries data by node IP with offset.
	QueryByNodeIPWithOffset(string, string, string) (string, error)
}

//变更为:
type ClientSet interface {
	// QueryByNodeIP queries data by node IP.
	QueryByNodeIP(string, string) (string, error)
	// QueryByNodeName queries data by node IP.
	QueryByNodeName(string, string) (string, error)
	// QueryByNodeIPWithOffset queries data by node IP with offset.
	QueryByNodeIPWithOffset(string, string, string) (string, error)
	// metrics 结果解析
	QueryParse(string, string) (model.Vector, error)
}
3.2 Node-exporter 变化
设计 BaseCollector 实现 prometheus.GaugeValue 数据内存计算和收集
type BaseCollector struct {
	metric []typedDesc
	logger log.Logger
}


// NewBaseCollector returns a new Collector exposing base average stats.
func NewBaseCollector(logger log.Logger) (Collector, error) {
	return &BaseCollector{
		metric: []typedDesc{
			{prometheus.NewDesc(namespace+"_avg_1m", "1m base average.", nil, nil), prometheus.GaugeValue},
			{prometheus.NewDesc(namespace+"_avg_5m", "5m base average.", nil, nil), prometheus.GaugeValue},
			{prometheus.NewDesc(namespace+"_avg_1d", "1d base average.", nil, nil), prometheus.GaugeValue},
		},
		logger: logger,
	}, nil
}

func (c *BaseCollector) Update(ch chan<- prometheus.Metric) error {
	loads, err := getData() // 实时指标
	if err != nil {
		return fmt.Errorf("couldn't get load: %w", err)
	}
	for i, load := range loads {
		level.Debug(c.logger).Log("msg", "return load", "index", i, "load", load)
		ch <- c.metric[i].mustNewConstMetric(load)
	}
	return err
}
通过配置
metrics:
	- name: cpu_usage_avg_5m
      period: 3m
    - name: cpu_usage_max_avg_1h
      period: 15m
    - name: cpu_usage_max_avg_1d
      period: 3h
    - name: mem_usage_avg_5m
      period: 3m
    - name: mem_usage_max_avg_1h
      period: 15m
    - name: mem_usage_max_avg_1d
      period: 3h
    //...
4. 发布
7 - Pod资源视图隔离
Pod 容器内资源可见性:让Pod的资源视角真实、准确
❓是否有个发现:Pod中限定了CPU、MEM等资源大小,然而登入的POD中查询资源,却还是Node总的资源大小?
对于业务上云, java(识别内存资源开辟堆大小)、golang(识别CPU个数开启runtime线程个数) 等语言,在OOM、GC方面的问题,有时常发生的原因
利用lxcfs将容器中读取出来的CPU、MEM、disk、swaps的信息是宿主机的信息,与容器实际分配和限制的资源量相同。 解决低层通过os.syscall获得的资源信息一致。
复现步骤
部署一个lxcfs-demo应用pod
apiVersion: v1
kind: Pod
metadata:
  name: lxcfs-demo
  namespace: default
spec:
  containers:
  - image: busybox
    command:
      - sleep
      - "3600"
    imagePullPolicy: IfNotPresent
    name: busybox
    resources:     #限制了pod资源大小
      requests:
        memory: "64Mi"
        cpu: "250m"
      limits:
        memory: "128Mi"
        cpu: "500m"
  restartPolicy: Always
登入到pod中查看真实资源视角, 如下:
dongjiangdeMacBook-Pro:kubernetes $ kubectl exec -it lxcfs-demo  "/bin/sh"
kubectl exec [POD] [COMMAND] is DEPRECATED and will be removed in a future version. Use kubectl exec [POD] -- [COMMAND] instead.
/ # free -h
              total        used        free      shared  buff/cache   available
Mem:           2.9G      802.9M      117.0M      333.4M        2.0G        1.6G
Swap:        512.0M        1.3M      510.7M
/ # cat /proc/cpuinfo| grep "cpu cores"| uniq   //物理Core数
cpu cores	: 1
/ # cat /proc/cpuinfo| grep "processor"| wc -l  //逻辑Core数
2
/ #
Pod 资源视角 与 部署要求限定的完全不一样。 Pod 内看到的系统信息,完全是Node的信息
Lxcfs介绍
lxcfs是一个FUSE文件系统,使得Linux容器的文件系统更像虚拟机。lxcfs是一个常驻进程运行在宿主机上,从而来自动维护宿主机cgroup中容器的真实资源信息与容器内/proc下文件的映射关系。
原理
lxcfs实现的基本原理: 通过文件挂载的方式,把POD OCI cgroup中容器相关的信息读取出来,存储到lxcfs相关的目录下,并将相关目录映射到容器内的/proc目录下,从而使得容器内执行top, free等命令时拿到的/proc下的数据是真实的cgroup分配给容器的CPU和内存数据。
lxcfs 的 Kubernetes使用
为了让 Node 上所有 Pod 多支持 lxcfs 资源视角. Kubernetes 中通过 daemonset 方式在每个 work节点上都启动
apiVersion: apps/v1
kind: DaemonSet
metadata:
  name: lxcfs
  labels:
    app: lxcfs
spec:
  selector:
    matchLabels:
      app: lxcfs
  template:
    metadata:
      labels:
        app: lxcfs
    spec:
      hostPID: true
      tolerations:
      - key: node-role.kubernetes.io/master
        effect: NoSchedule
      containers:
      - name: lxcfs
        image: dongjiang1989/lxcfs:v4.0.12
        imagePullPolicy: Always
        securityContext:
          privileged: true
        volumeMounts:
        - name: cgroup
          mountPath: /sys/fs/cgroup
        - name: lxcfs
          mountPath: /var/lib/lxcfs
          mountPropagation: Bidirectional
        - name: usr-local
          mountPath: /usr/local
      volumes:
      - name: cgroup
        hostPath:
          path: /sys/fs/cgroup
      - name: usr-local
        hostPath:
          path: /usr/local
      - name: lxcfs
        hostPath:
          path: /var/lib/lxcfs
          type: DirectoryOrCreate
lxcfs-admission-webhook 实现了一个动态的准入webhook,更准确的讲是实现了一个修改性质的webhook,即监听pod的创建,然后对pod执行patch的操作,从而将lxcfs与容器内的目录映射关系植入到pod创建的yaml中从而实现自动挂载。
apiVersion: apps/v1
kind: Deployment
metadata:
  name: lxcfs-admission-webhook-deployment
  namespace: kube-system
  labels:
    app: lxcfs-admission-webhook
spec:
  replicas: 1
  selector:
    matchLabels:
      app: lxcfs-admission-webhook
  template:
    metadata:
      labels:
        app: lxcfs-admission-webhook
    spec:
      serviceAccountName: lxcfs-webhook-serviceaccount
      containers:
        - name: lxcfs-admission-webhook
          image: dongjiang1989/lxcfs-webhook:latest
          imagePullPolicy: Always
          args:
            - -tlsCertFile=/etc/webhook/certs/tls.crt
            - -tlsKeyFile=/etc/webhook/certs/tls.key
            - -alsologtostderr
            - -v=4
            - 2>&1
          resources:
            limits:
              cpu: 500m
              memory: 128Mi
            requests:
              cpu: 10m
              memory: 64Mi
          volumeMounts:
            - mountPath: /etc/webhook/certs/
              name: cert
              readOnly: true
      volumes:
      - name: cert
        secret:
          defaultMode: 420
          secretName: lxcfs-webhook-server-cert
需要Linux OS,开启FUSE模块支持. Mac 是unix的裁剪系统,不支持FUSE
验证结果
测试Demo
apiVersion: apps/v1
kind: Deployment
metadata:
  name: httpd-test
spec:
  replicas: 1
  selector:
    matchLabels:
      app: httpd-test
  template:
    metadata:
      labels:
        app: httpd-test
    spec:
      tolerations:
      - key: node-role.kubernetes.io/master
        effect: NoSchedule
      containers:
        - name: httpd
          image: httpd:2.4.32
          imagePullPolicy: Always
          resources:
            requests:
              memory: "256Mi"
              cpu: "1"
            limits:
              memory: "256Mi"
              cpu: "1"
验证信息
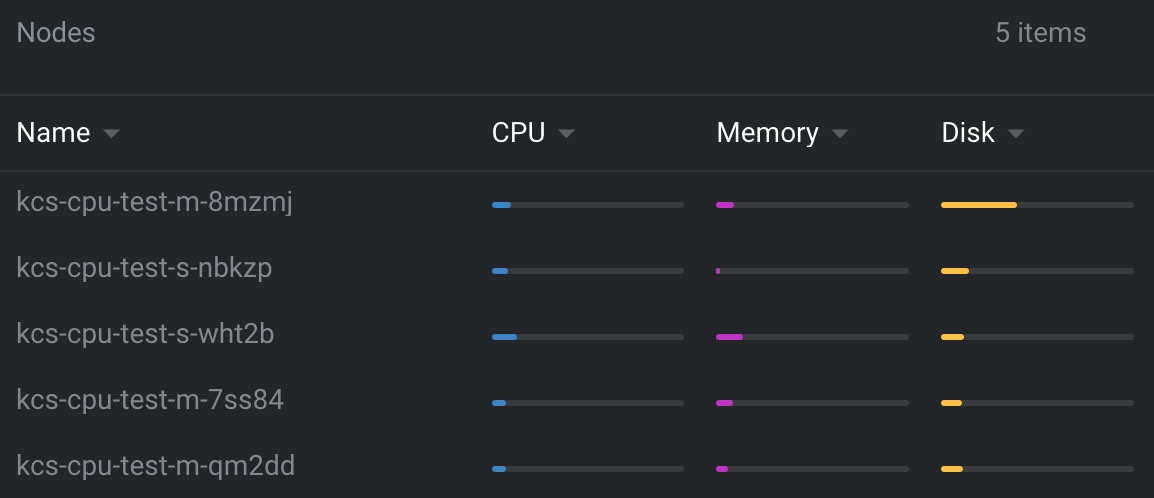
- Node机器资源:
16G内存、2CPU 4核
[root@kcs-cpu-test-m-qm2dd /]#  free -h
              total        used        free      shared  buff/cache   available
Mem:            15G        2.0G        2.5G        4.4M         10G         12G
Swap:            0B          0B          0B
[root@kcs-cpu-test-m-qm2dd /]#  cat /proc/cpuinfo | grep "physical id"
physical id     : 0
physical id     : 0
physical id     : 1
physical id     : 1
[root@kcs-cpu-test-m-qm2dd /]#  cat /proc/cpuinfo | grep processor
processor       : 0
processor       : 1
processor       : 2
processor       : 3
- Pod内信息
Pod 内 内存是256M; CPU是1Core
[root@kcs-cpu-test-m-qm2dd /]#  kubectl  get pod | grep "httpd-test"
httpd-test-68b9b9d74f-5tmnh       1/1     Running   0          11m

[root@kcs-cpu-test-m-qm2dd /]#  kubectl exec -it httpd-test-68b9b9d74f-5tmnh "/bin/bash"
kubectl exec [POD] [COMMAND] is DEPRECATED and will be removed in a future version. Use kubectl exec [POD] -- [COMMAND] instead.

root@httpd-test-68b9b9d74f-5tmnh:/usr/local/apache2# free -h
             total       used       free     shared    buffers     cached
Mem:          256M       8.4M       247M       268K         0B       272K
-/+ buffers/cache:       8.1M       247M
Swap:           0B         0B         0B

[root@kcs-cpu-test-m-qm2dd /]#  top
top - 09:31:23 up 15 min,  0 users,  load average: 0.00, 0.00, 0.00
Tasks:   6 total,   1 running,   5 sleeping,   0 stopped,   0 zombie
%Cpu0  :  4.5 us,  2.1 sy,  0.0 ni, 93.4 id,  0.0 wa,  0.0 hi,  0.0 si,  0.0 st
KiB Mem:    262144 total,     9072 used,   253072 free,        0 buffers
KiB Swap:        0 total,        0 used,        0 free.      276 cached Mem
8 - AI之 模型仓库: model register 开源实现 modelx 2.0
基于kubegems/modelx实现开源模型仓库: modelx 2.0
一、为什么要自己设计模型仓库
目前 大模型 各个平台(例如: ollama、 huggingface hub、 modelscope) 基本上半开源状态。
主要开源的是: 大模型整合框架(modelscope sdk)、本地工具集(huggingface hub libaray)、本地客户端(如ollama.app )等, 服务端核心 model hub 都是没有开源的。
因此, 寻找一种更友好的方式来存储我们的模型。
1.1 寻找替代品
我们曾经在使用 ormb 时遇见了问题,由于我们的模型有的非常大(数十 GB),在使用 ormb 时将会面临:
ormb push时,harbor报错。原因是harbor内存超出限制以及 harbor 接入的 s3 有单文件上传大小限制。- 每当模型有变动时(即使变动很小),都会重新生成全量的镜像层,在部署时都需要重新拉取数十 GB 的文件。
- 其他相关问题。
此外,我们还正在开发新的
算法商店,需要一个能够和算法商店对接的模型仓库服务,以便于仓库中的模型能够在算法商店中更好的展示。
为此,需要寻找新的替代方案。需要能够满足:
- 支持模型readme预览,能查看模型文件列表。
- 可以版本化管理并支持增量。
1.1.1 参考 huggingface hub 实现
Huggingface 使用了 git + lfs 模型进行模型托管,将小文件以及代码使用 git 进行版本管理,将模型或其他大文件存放至 git lfs。
这种方式增加了一个 git 服务,对于大流量时,git 服务会成为瓶颈。 对于私有化部署,需要引入一个 git server 和对 git servre 的多租户配置,对于我们来说确实不够精简。 而且使用 git 方式,模型数据会在两个地方存放,增加维护成本。
1.1.2 参考 云厂商 实现:
一众云厂商的解决方案是将模型存储到对象存储(如:华为 ModelArts ,百度 BML,阿里 PAI,腾讯 TI-ONE,Amazon SageMaker 等)。 对于公有云来说,提供 ML 解决方案同时将数据都放在对象存储中是最好的方式。
但在私有云中,虽然也用对象存储,但我们没有 ML 的配套方案。若让用户将模型直接存储在对象存储中,将难以进行版本控制。 我们需要提供一套管理机制,放在用户和对象存储之间。
1.1.3 参考 docker hub AI Gen 实现
使用 OCI registry, 可以将模型存储在 OCI registry 中。将 big layer 进行拆分,增加文件复用。 这又带来新问题,对于使用者来说,必须要使用修改后的 ormb 才能正常下载模型。
二、站在ollama巨人肩膀上,从0.1开始
以 OCI 作为服务端,OCI 服务端后端存储对接到 S3。OCI 仓库不使用harbor,选择了更轻量的 docker registry v2。 将模型使用合适的方法分层然后 push 到 OCI 仓库,下载时再将模型拉下来合并还原。
sequenceDiagram
    User->>User: Split
    User->>OCI: push
    OCI->>S3: upload
    S3->>OCI: download
    OCI->>User: pull
    User->>User: Merge
我们的数据经过了 本地->OCI->S3 并存储起来了。但是,如果流量再大一点呢,OCI 或许是新的瓶颈。 那能不能 本地->S3 呢?这样岂不是又快又好了。
上面说到在直接使用对象存储时我们面临的问题为难以进行版本控制,且 s3 的 key 需要分发到客户端,更难以进行权限控制。
因此:
这里借鉴 git lfs 提供的思路,将文件直接从 git 直接上传到 git lfs server,而 git server 仅做了协调。
sequenceDiagram
    autonumber
    User->>Git: push
    Git->>User: push lfs meta
    User->>LFS: upload
    Git->>User: pull
    Git->>User: pull lfs meta
    LFS->>User: download
于是一个新的结构产生了:
sequenceDiagram
    participant User
    User->>Modelx: push a(hash:xxx)
    alt Describing exists?
        Modelx ->> User: already exists
    else
        Modelx ->> S3: generate presign urls
        S3 ->> Modelx: generated upload url
        Modelx->>User: push to url
        User->>S3: upload
    end
    User->>Modelx: done
这个协调者负责沟通用户和 S3,并包含了鉴权等,核心流程为:
- 用户本地将模型合理打包成多个文件,并计算文件的 hash 准备上传。
- 检查该 hash 的文件是否存在,若存在即结束,不做操作。
- 若不存在则 modelx 返回一个临时 url,客户端向该 url 上传。
- 上传完成后通告 modelx。
这和 git lfs 非常像, git lfs 也有基于 S3 的实现, 但是我们不需要引入一个完整的 git server(带来了额外的复杂度)。
好了,总体思路确定后,开始完善每个流程的细节,这个新的东西称为 modelx 。
三、modelx 定义
3.1 数据存储
先解决如何存储数据,先看存储部分 server 端接口:
参考 OCI 我们 server 端仅包含三种核心对象:
| name | description |
|---|---|
| index | 全局索引,用于寻找所有 manifest |
| manifest | 版本描述文件,记录版本包含的 blob 文件 |
| blob | 数据文件,实际存储数据的类型 |
所以一个参考ollama manifest 示例为:
schemaVersion:
mediaType:
config:
  - name: modelx.yaml
    digest: sha256:xxxxxxxx...
    mediaType: "?"
    size: 45
blobs:
  - name: file-a.bin
    digest: sha256:xxxxxxxx...
    mediaType: ""
    size: 18723
  - name: file-b.bin
    digest: sha256:xxxxxxxx...
    mediaType: "?"
    size: 10086
annotaitons:
  description: "some description"
服务端接口:
| method | path | description |
|---|---|---|
| GET | / | 获取全局索引 |
| GET | /{repository}/{name}/index | 获取索引 |
| GET | /{repository}/{name}/manifests/{tag} | 获取特定版本描述文件 |
| DELETE | /{repository}/{name}/manifests/{tag} | 删除特定版本描述文件 |
| HEAD | /{repository}/{name}/blobs/{digest} | 判断数据文件是否存在 |
| GET | /{repository}/{name}/blobs/{digest} | 获取特定版本数据文件 |
| PUT | /{repository}/{name}/blobs/{digest} | 上传特定版本数据文件 |
似曾相识,对,这和 OCI registry 的接口非常像,但是更简单了。
上传流程:
- 客户端准备本地文件,对每个需要上传的 blob 文件,计算 sha256。生成 manifest。
- 客户端对每个 blob 文件执行:
- 检查服务端是否存在对应 hash 的 blob 文件,如果存在,则跳过。
- 否则开始上传,服务端存储 blob 文件。服务端可能存在重定向时遵循重定向。
- 在每个 blob 均上传完成后,客户端上传 manifest 文件
- 服务端解析 manifest 文件,更新 index。
这里有一个隐形约定:客户端在上传 manifest 之前,确保已经上传了所有 blob。 上传 manifest 意味着客户端承诺上传了 manifest 中所有的部分,以便于其他客户端可以发现并能够下载完整的数据。
下载流程:
- 客户端向服务端查询 index 文件,获取 manifest 文件的地址。
- 客户端向服务端获取 manifest 文件,并解析 manifest 文件,获取每个 blob 文件的地址。
- 客户端对每个 blob 文件执行:
- 检查本地文件是否存在,如果存在,判断 hash 是否相等,若相等则认为本地文件于远端相同无需更新。
- 若不存在或者 hash 不同,则下载该文件覆盖本地文件。
我们实现了一个简单的文件服务器,这对我们来说已经可以用了。
3.2 负载分离
这就是一个简单的文件服务器,数据还是流过了 modelx, 那如何实现直接本地直接上传到 S3 流程呢?
这里借助了 302 状态码,当客户端上传 blob 时,可能收到 302 响应, 此时 Location Header 会包含重定向的 URI,客户端需要重新将 blob 上传至该地址。下载时也使用相同逻辑。
在使用S3作为存储后端时,我们使用到了s3 presign urls,能够对特定object生成临时 url 来上传和下载,这非常关键。
sequenceDiagram
    participant User
    User ->> Modelx: POST /repository/blobs/hash:xxx
    Modelx->>User: 302 Location: uri
    User->>Storage: POST uri
为了支持非 http 协议存储,客户端需要在收到 302 响应后根据具体地址使用不同的方式处理上传。
- 对于 http ,会收到以
http(s)://开头的重定向地址,此时客户端继续使用 http 协议上传至该地址。 - 对于 S3,可能收到以
s3://开头的 presign 的 S3 地址,则此时则需要客户端转为使用 s3 client 上传 blob 到该地址。 - 此外,服务端还可以响应其他协议的地址,客户端可以自行实现并扩展到其他存储协议。
这基本上是一个简单高效的,可索引的,版本化的文件存储服务。不仅可以用于存储模型,甚至可以推广到存储镜像,charts 等。
四、为什么不用OCI?
我们在研究了OCI destribution 的协议后,发现OCI协议在上传接口上无法做到能够让客户端直接与存储服务器交互。 总是需要在最终的存储服务器前增加一个适应层。 详细的可以参看 OCI Distribution Specification。
OCI 中无法获得模型文件列表,从而无法仅下载指定文件。
4.1 模型存储
在已有的服务端实现中,可以看到 modelx 服务端仅负责文件存储,对于 manifest 中实际包含哪些 blob,还是由客户端决定。
我们的最终目的是用于存储模型,面临的模型可能有超大单文件以及海量小文件的场景。 除了解决如何将模型存储起来,还需要解决如何管理多个模型版本,模型下载(增量下载)。
在上一节的 manifest 中,每一个 blob 都包含了 mediaType 字段,以表示该文件的类型。可以从这里进行扩展。
- 对于单个大文件,可以不用特殊处理,客户端会在上传和下载时使用 s3 client 分块处理。
- 对于海量小文件,选择在客户端将小文件打包压缩为单文件,设置特别的 mediaType 进行上传;在下载时,对特别的 mediaType 进行解包还原。
- 对于增量,类似于OCI image,客户端会在本地计算更改的文件,客户端仅用上传改变的文件。在下载时,客户端也会仅下载与远程对比 hash 不同的文件。
- 对于部署,部署时可能仅需要下载某一个文件,则可以借助 modelx.yaml,在其中指定仅需要在部署时下载的模型文件。
同时
modelx.yaml还包含了model-serving时所需要的一些信息。
在 modelx 2.0 中 modelx.yaml例子:
config:
  inputs: {}
  outputs: {}
description: Awesome text generator
framework: pytorch
maintainers:
  - maintainer
tags:
  - modelx
  - demo
annotations:
  user: dongjiang
  aa: bb
resources:
  cpu: "4"
  gpu:
    nvdia:
      nvdia/gpu: "1"
    memory: 16Gi
task: text-generation
args:
  - python3
  - -m vllm.entrypoints.openai.api_server
  - --model ./
  - --port 8000
  - --max-num-batched-tokens 8192
modelFiles:
  - torch.bin
  - tf_output.h5
dependencies:
  - modelbaseA
  - modelbaseB
4.2 认证授权
有了上面的实现,认证可以插入到服务端几个接口中,对请求进行拦截。
五、Developer Roadmaps
-
支持模型modelx vendor管理
-
支持模块依赖管理 modelx dependencies
-
支持模型modelx verify校验
-
支持模型modelx2.0 struct
-
支持高可用:对接etcd、redis为源数据系统
-
支持ollama server端接口,实现ollama pull方式拉获
-
支持按 tags、annotations做模型检索
-
支持model diff,对比模型差异
-
支持通用auth认证:比如:jwt等
-
支持mirrors从huggingface 和 ollama同步模型和数据集
六、总结
最终来说,我们实现了一个简单的、 高性能的、可扩展的模型存储服务。 结合了 OCI、git-lfs 和 对象存储的优势,并解决了我们在模型管理遇到的问题。 未来 modelx 依旧还有许多事情要做,欢迎大家参与到 modelx 以及 kubegems 社区中来。
其他
9 - Kubernetes Pod进程网络带宽 流量控制
背景
混合云场景业务Pod直接相互干扰 、 在离线混部(在离线服务同时在一台机器上服务用户) 等场景下,除了对cpu、mem、fd、inode、pid等进行隔离,还需要对 网络带宽bandwidth、磁盘读写速度IPOS、NBD IO、L3 Cache、内存带宽MBA 等都需要做到隔离和限制
因此,本章节介绍下 网络带宽bandwidth limit 的使用和实现
Kubernetes 具体使用和实现
容器拉起,是通过运行时接口对底层cni网络插件来生产虚拟网络,bind到容器实现。对容器进行网络限制,底层需要cni网络插件的限制,而cni网络插件 会将网络限制指令,将具体配置提交给 Linux 流量控制 (tc) 子系统,tc 包含一组机制和操作,数据包通过这些机制和操作在网络接口上排队等待传输/接收(令牌桶过滤器TBF),从而达到流量控制
CNI 对 Linux TC 操作
{
  "name": "k8s-pod-network",
  "cniVersion": "0.3.0",  #必须0.3.0 containernetworking plugin 目前最高版本
  "plugins":
    [
      {
        "type": "calico",
        "log_level": "info",
        "datastore_type": "kubernetes",
        "nodename": "127.0.0.1",
        "ipam": { "type": "host-local", "subnet": "usePodCidr" },
        "policy": { "type": "k8s" },
        "kubernetes": { "kubeconfig": "/etc/cni/net.d/calico-kubeconfig" },
      },
      {
    	"type": "bandwidth",
    	"capabilities": {
			"bandwidth": true   #支持cri-o json配置提交
		},
		/* 以下是对cni插件网络限流操作, capabilities和一下4个配置二选一
		"ingressRate": 123,
      	"ingressBurst": 456,
        "egressRate": 123,
        "egressBurst": 456
        */
	  },
    ]
}
cni插件支持本配置,也支持cri-o、contaierd、dockershim等通过json配置提交
func cmdAdd(args *skel.CmdArgs) error {
	// cni 配置解析
	conf, err := parseConfig(args.StdinData)
	if err != nil {
		return err
	}

	//...

	// 从配置中活动 ingress Rate和Burst
	if bandwidth.IngressRate > 0 && bandwidth.IngressBurst > 0 {
		// TC TBF 中创建流控规则
		err = CreateIngressQdisc(bandwidth.IngressRate, bandwidth.IngressBurst, hostInterface.Name)
		if err != nil {
			return err
		}
	}

	// 从配置中活动 egress Rate和Burst
	if bandwidth.EgressRate > 0 && bandwidth.EgressBurst > 0 {
		// ...

		// 对特定本地Device设置出口流控规则
		err = CreateEgressQdisc(bandwidth.EgressRate, bandwidth.EgressBurst, hostInterface.Name, ifbDeviceName)
		if err != nil {
			return err
		}
	}

	return types.PrintResult(result, conf.CNIVersion)
}
OCR 流控配置
通过Pod配置annotations
apiVersion: v1
kind: Pod
  metadata:
    name: iperf-slow
  annotations:
    kubernetes.io/ingress-bandwidth: 10M
    kubernetes.io/egress-bandwidth: 10M
...
Kubenetes 代码支持在 pod annotations解析和使用
kubernetes.io/ingress-bandwidth 和 kubernetes.io/egress-bandwidth 值只是支持 1k-1P, 超过32G需要调整Kernel参数
// 配置值在 1k-1p之间
var minRsrc = resource.MustParse("1k")
var maxRsrc = resource.MustParse("1P")

// 获取pod annotations并传递给 runc
func ExtractPodBandwidthResources(podAnnotations map[string]string) (ingress, egress *resource.Quantity, err error) {
	if podAnnotations == nil {
		return nil, nil, nil
	}
	str, found := podAnnotations["kubernetes.io/ingress-bandwidth"]
	if found {
		ingressValue, err := resource.ParseQuantity(str)
		if err != nil {
			return nil, nil, err
		}
		ingress = &ingressValue
		if err := validateBandwidthIsReasonable(ingress); err != nil {
			return nil, nil, err
		}
	}
	str, found = podAnnotations["kubernetes.io/egress-bandwidth"]
	if found {
		egressValue, err := resource.ParseQuantity(str)
		if err != nil {
			return nil, nil, err
		}
		egress = &egressValue
		if err := validateBandwidthIsReasonable(egress); err != nil {
			return nil, nil, err
		}
	}
	return ingress, egress, nil
}
以contaierd为例, kubelet 活动 pod yaml信息后续,传递给containerd runtime,并继续传递给cni插件
func cniNamespaceOpts(id string, config *runtime.PodSandboxConfig) ([]cni.NamespaceOpts, error) {
	opts := []cni.NamespaceOpts{
		cni.WithLabels(toCNILabels(id, config)),
		cni.WithCapability(annotations.PodAnnotations, config.Annotations),
	}

	portMappings := toCNIPortMappings(config.GetPortMappings())
	if len(portMappings) > 0 {
		opts = append(opts, cni.WithCapabilityPortMap(portMappings))
	}

	// pod annotations中获得配置,最后传递给cni
	bandWidth, err := toCNIBandWidth(config.Annotations)
	if err != nil {
		return nil, err
	}
	if bandWidth != nil {
		opts = append(opts, cni.WithCapabilityBandWidth(*bandWidth))
	}
	// ...
}
验证和测试
** 流控依赖Linux TC子系统。目前只支持Linux K8s集群 **
apiVersion: apps/v1
kind: Deployment
metadata:
  name: iperf-server-deployment
  labels:
    app: iperf-server
spec:
  replicas: 1
  selector:
    matchLabels:
      app: iperf-server
  template:
    metadata:
      labels:
        app: iperf-server
      #添加注解
      annotations:
        kubernetes.io/ingress-bandwidth: 1M
        kubernetes.io/egress-bandwidth: 1M
    spec:
      tolerations:
        - key: node-role.kubernetes.io/master
          operator: Exists
          effect: NoSchedule
      containers:
      - name: iperf3-server
        image: dongjiang1989/iperf
        args: ['-s', '-p', '5001']
        ports:
        - containerPort: 5001
          name: server
      terminationGracePeriodSeconds: 0

---

apiVersion: apps/v1
kind: Deployment
metadata:
  name: iperf-client
  labels:
    app: iperf-client
spec:
  replicas: 1
  selector:
    matchLabels:
      app: iperf-client
  template:
    metadata:
      labels:
        app: iperf-client
    spec:
      containers:
      - name: iperf-client
        image: dongjiang1989/iperf
        command: ['/bin/sh', '-c', 'sleep 1d']
      terminationGracePeriodSeconds: 0
对于未添加网络限流注解
$ kubectl get pod | grep iperf
iperf-client-7874c47d95-t7hph              1/1     Running   0               5m58s
iperf-server-deployment-74d94bdd59-dzdl4   1/1     Running   0               5m58s
kubectl exec iperf-client-7874c47d95-t7hph -- iperf -c 10.1.0.173 -p 5001 -i 10 -t 100
------------------------------------------------------------
Client connecting to 10.1.0.173, TCP port 5001
TCP window size: 85.0 KByte (default)
------------------------------------------------------------
[  1] local 10.1.0.172 port 56296 connected with 10.1.0.173 port 5001
[ ID] Interval       Transfer     Bandwidth
[  1] 0.00-10.00 sec  19.7 GBytes  16.9 Gbits/sec
[  1] 10.00-20.00 sec  18.9 GBytes  16.2 Gbits/sec
[  1] 20.00-30.00 sec  20.0 GBytes  17.2 Gbits/sec
[  1] 30.00-40.00 sec  20.4 GBytes  17.5 Gbits/sec
[  1] 40.00-50.00 sec  18.5 GBytes  15.9 Gbits/sec
[  1] 50.00-60.00 sec  19.3 GBytes  16.5 Gbits/sec
[  1] 60.00-70.00 sec  17.6 GBytes  15.1 Gbits/sec
[  1] 70.00-80.00 sec  17.1 GBytes  14.7 Gbits/sec
[  1] 80.00-90.00 sec  18.4 GBytes  15.8 Gbits/sec
[  1] 90.00-100.00 sec  15.1 GBytes  13.0 Gbits/sec
[  1] 0.00-100.00 sec   185 GBytes  15.9 Gbits/sec
未做限流,Bandwidth可以到15.9Gbits/sec
对于添加网络限流注解
$ kubectl get pod | grep iperf
iperf-clients-rcsh6                        1/1     Running   0          7h7m
iperf-server-deployment-59675c8f78-g52pm   1/1     Running   0          6h52m

$ kubectl exec iperf-clients-rcsh6 -- iperf -c 10.1.0.170 -p 5001 -i 10 -t 100
------------------------------------------------------------
Client connecting to 10.1.0.170, TCP port 5001
TCP window size: 45.0 KByte (default)
------------------------------------------------------------
[  1] local 10.1.0.170 port 54652 connected with 10.1.0.170 port 5001
[ ID] Interval       Transfer     Bandwidth
[  1] 0.00-10.00 sec  3.50 MBytes  2.94 Mbits/sec
[  1] 10.00-20.00 sec  2.25 MBytes  1.89 Mbits/sec
[  1] 20.00-30.00 sec  2.04 MBytes  1.71 Mbits/sec
[  1] 30.00-40.00 sec   892 KBytes   731 Kbits/sec
[  1] 40.00-50.00 sec   954 KBytes   781 Kbits/sec
[  1] 50.00-60.00 sec  1.36 MBytes  1.14 Mbits/sec
[  1] 60.00-70.00 sec  1.18 MBytes   993 Kbits/sec
[  1] 70.00-80.00 sec  87.1 KBytes  71.4 Kbits/sec
[  1] 80.00-90.00 sec  0.000 Bytes  0.000 bits/sec
[  1] 90.00-100.00 sec  2.97 MBytes  2.50 Mbits/sec
[  1] 0.00-100.69 sec  15.5 MBytes  1.29 Mbits/sec
限制1Mbits/sec, 流控真实表现是 1.29 Mbits/sec
- 为啥限制
1Mbits/sec, 流控真实表现略大约1Mbits/sec? - 原因:在Linux系统中,
1M = 1024k的; 而 K8s中使用Resource对象实现的1M = 1000k的. - 因此,真实 设置
1Mbits/sec在 Linux 中的表现应该是1024*1024(bits/sec)/(1000*1000) = 1.048Mbits/sec. - 在0-1s之间,TC控制不准确,会有数据平均
增大的问题
总结
-
- docker
1.18支持runc runtime json传递;containerd作为runtime,1.4版本才能支持;
- docker
-
- calico需要
2.1版本; cilium需要1.12.90版本; kube-ovn需要版本1.9.0版本;但是需要支持
`ovn.kubernetes.io/ingress_rate` : Ingress 流量的速率限制,单位:Mbits/s `ovn.kubernetes.io/egress_rate` : Egress 流量的速率限制,单位:Mbits/s - calico需要
-
- 不能动态更新annotation里面的流量限制大小,更新之后必须删除pod重建;
因此,需要通过webhook来将丰富配置namespcae下的limitrange含义拉齐, 并支持默认填充
具体实现方式
先通过 CRD 描述 namespace 下 limitrange 扩展限制
设计如下:
apiVersion: custom.xxx.com/v1
kind: CustomLimitRange
metadata:
  name: test-rangelimit
spec:
  limitrange:
    type: pod      # 对pod类型限制,以后扩展到 contianer类型、ingress类型、service类型
    max:           # max和min是限制的上下线,如果pod自定义的值不在其中,ValidatingAdmissionWebhook校验报错
      ingress-bandwidth: "1G"
      egress-bandwidth: "1G"
    min:
      ingress-bandwidth: "10M"
      egress-bandwidth: "10M"
    default:          # 定义了default,如果pod annotation为空,MutatingAdmissionWebhook自动注入此数据;未定义default,不作强注入操作
      ingress-bandwidth: "128M"
      egress-bandwidth: "128M"
在pod 可以是支持设置 customlimitrange.kubernetes.io/limited : disable, 可支持 ignore namespace下CustomLimitRange限制
注意
本身CustomLimitRange自身校验必不可少:
- max value >= default value >= min value
- value range [1k, 1P] && value 类型 Kbits/sec, Mbits/sec, Gbits/sec, Tbits/sec 和 Pbits/sec
- type 类型 enum
- max、min 和 default 可缺省
- 内部适配:kube-ovn annotation
使用方式
-
- Pod和Deployment添加注解annotation
# Pod
apiVersion: v1
kind: Pod
metadata:
  name: xxxx
  annotations:
    kubernetes.io/ingress-bandwidth: 1M
    kubernetes.io/egress-bandwidth: 1M
...


# Deployment
...
 spec:
  template:
    metadata:
      #添加注解
      annotations:
        kubernetes.io/ingress-bandwidth: 1M
        kubernetes.io/egress-bandwidth: 1M
...
-
- 通过定义Custom LimitRange 自动添加annotation. 如以上
下一章节
10 - 基于kata direct volume特性, 实现安全容器KataContainer的 CSI block volume直通方案
在 Kubernetes 中集成 Kata Containers 可以为容器运行时提供更好的安全性和隔离性,但在存储方面仍然还存在一些限制与不足。
目前方案:virtiofs协议
Kata Containers 在 2.4 版本之前,挂载 PV 的整个过程与 CSI 之间是没有任何交互的,而且也不能直接使用 CSI 挂载的 PV,只能通过 virtiofs 协议 将宿主机上的存储卷以文件共享的方式提供给 Kata Containers 虚拟机中的 container 使用。
这种方式虽然能够解决 PV 存储挂载的问题,但与直接在宿主机上使用存储卷相比,由于 virtiofs 实现方式的 I/O 路径过长,会带来不少的性能损耗。
经过环境实测,总结出以下几方面问题:
-
稳定性方面:在实际环境中,对virtiofs共享的盘进行fio 测试,我们经常能观察到 io 不连续的现象,并且在对盘进行加压测试时,会影响到容器中其他进程的响应,比如 ssh 进程响应会超时; -
性能方面:与直接在宿主机上使用存储卷相比,virtiofs共享盘在iops和带宽方面有不少差距; -
功能方面:virtiofs共享盘方式无法在线调整PV大小,需要通过重启Pod才能使VM能感知到PV大小变化;
优化方案
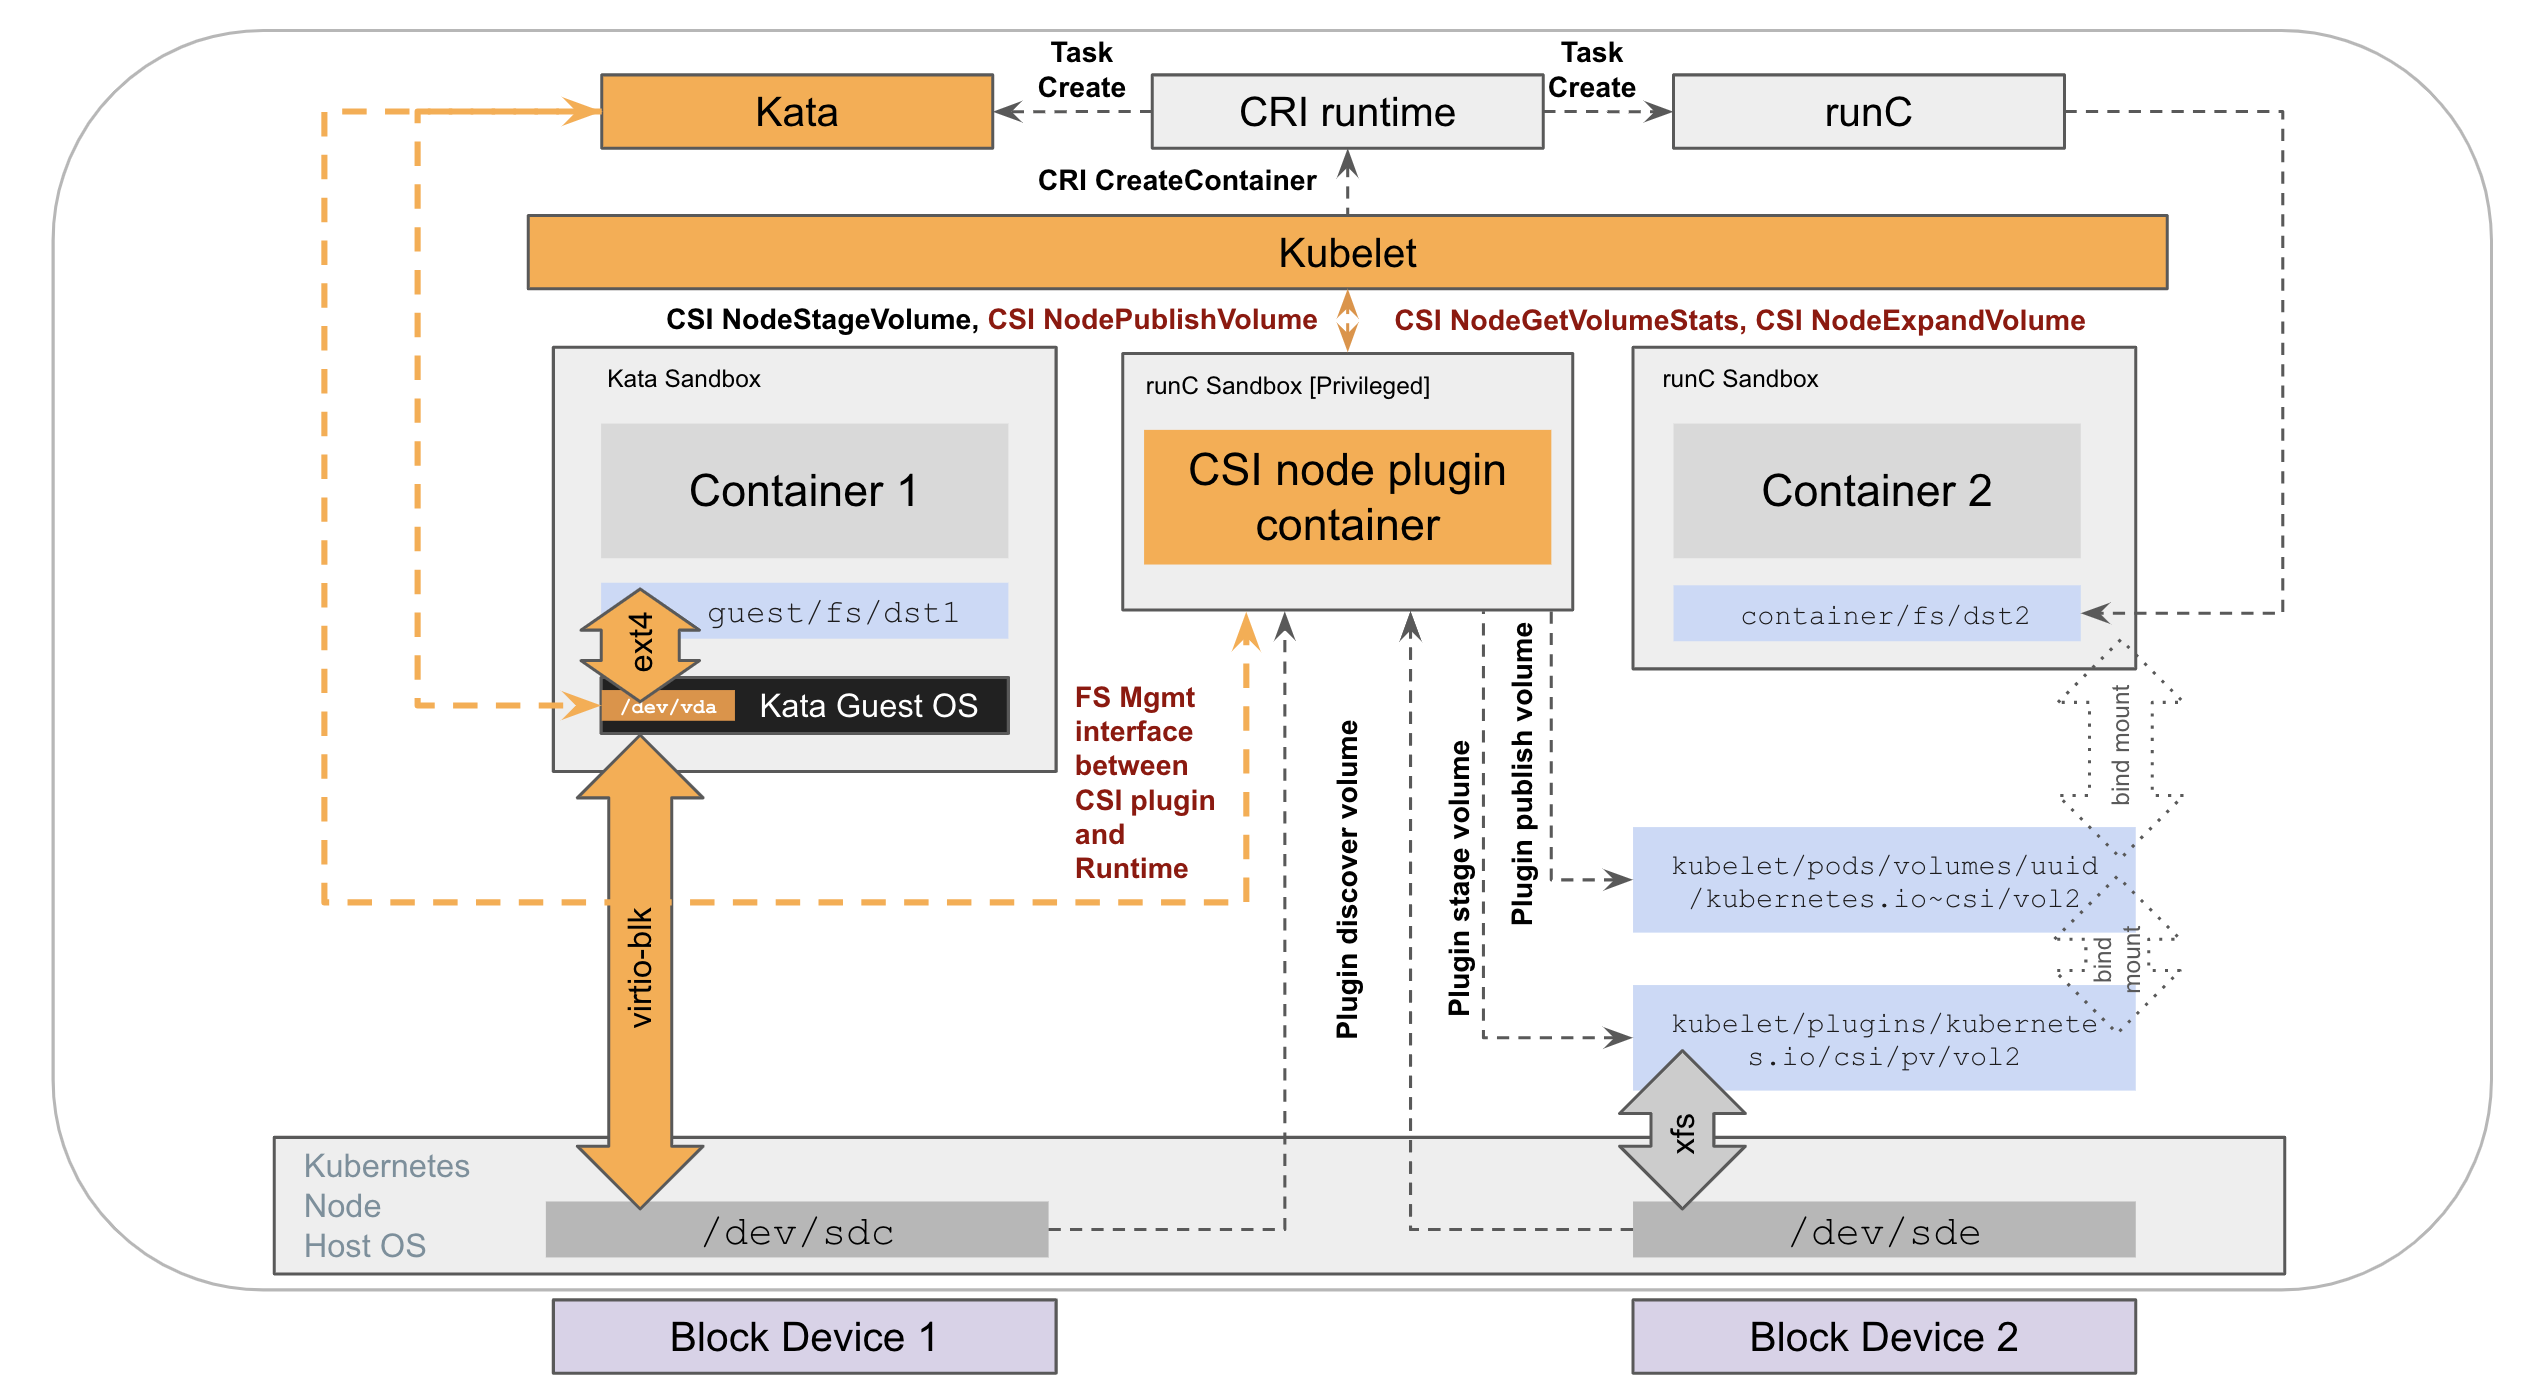
基于 virtiofs 现存问题,Kata Containers 在 2.4 版本提供了 direct assigned volume 功能,能够将文件系统挂载操作从宿主机移动到 Guest 中,相当于是一种 block volume 直通方案。和 virtiofs 相比,不仅能提供接近直接宿主机上使用存储卷的性能,而且还能支持 native FS。由于不需要借助于 virtiofs,在使用上会更加稳定,也能带来安全性方面的提升。同时,这个特性还支持在线修改 PV 存储大小。
具体kata direct assigned volume 特性设计:https://github.com/kata-containers/kata-containers/blob/main/docs/design/direct-blk-device-assignment.md
在 CSI 中实现 direct volume
前提条件
-
由于需要在
host上创建文件,CSI node服务在部署时需要把/run/kata-containers/shared/direct-volumes目录以hostpath方式挂载到pod里。 -
CSI在挂载时需要明确知道所挂载的volume是否是以direct volume这种方式挂载,所以需要有一种机制能通知到CSI,可以借助以下三种方式:通过
StorageClass指定direct volume属性在
PVC对象里通过annotation打上direct volume属性,同时 CSI 插件需要打开--extra-create-metadata属性来帮助CSI能从K8s apiserver查询到PVC的annotation信息通过查询
Pod的runtimeclass信息来判断是否是Kata direct volume挂载
实现步骤
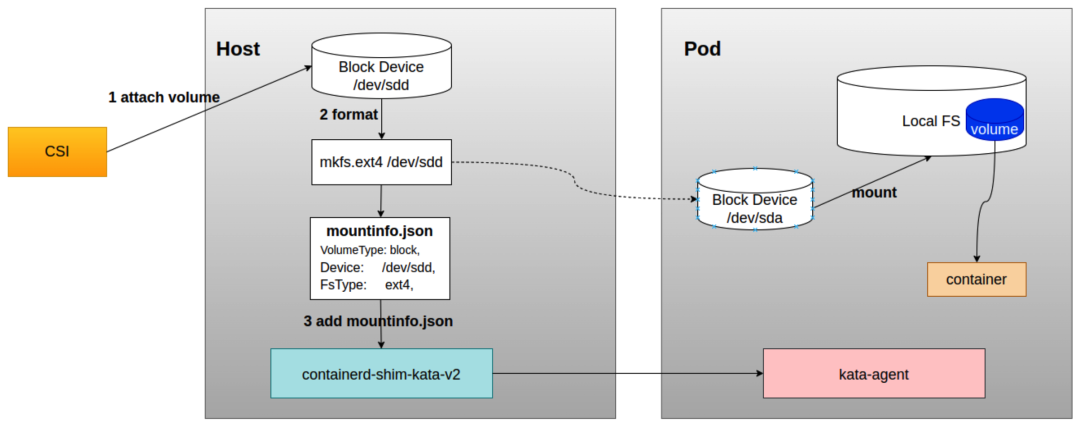
以下步骤主要都在 CSI NodePublishVolume 接口里实现:
- 把远程存储的
block device挂载到host上。 - 根据实际需求场景对
block device做文件系统格式化。 - 生成
mountinfo.json信息并把mountinfo.json信息传递给 Kata。
mountInfo 的内容是 json 格式,主要数据结构如下:
// MountInfo contains the information needed by Kata to consume a host block device and mount it as a filesystem inside the guest VM.
type MountInfo struct {
	// The type of the volume (ie. block)
	VolumeType string `json:"volume-type"`
	// The device backing the volume.
	Device string `json:"device"`
	// The filesystem type to be mounted on the volume.
	FsType string `json:"fstype"`
	// Additional metadata to pass to the agent regarding this volume.
	Metadata map[string]string `json:"metadata,omitempty"`
	// Additional mount options.
	Options []string `json:"options,omitempty"`
}
其中 CSI 侧主要需要传递以下三个字段信息即可,例如:
mountInfo := &volume.MountInfo{
				VolumeType: "block",  // 设备类型
    				Device:     dev/sdd,  // 块设备路径
    				FsType:     ext4,     // 文件系统类型
			}
volume.Add("/run/kata-containers/shared/direct-volumes/volume-path(base64加密)/", mountInfo)
CSI 负责把 mountinfo.json 传递给 Kata,Kata 会在容器所在 host 的 /run/kata-containers/shared/direct-volumes/volume-path(base64加密)/ 目录下生成 mountinfo.json 文件,目前 CSI 有两种方式可以传递 mountinfo.json 信息
- 通过调用
kata-container代码里direct volume模块的add方法传递mountinfo.json信息,部分代码实例如下:
import (
    "encoding/json"
    volume "github.com/kata-containers/kata-containers/src/runtime/pkg/direct-volume"
    "google.golang.org/grpc/status"
    klog "k8s.io/klog/v2"
)

// NodePublishVolume 中发布
func AddDirectVolume(volumePath, device, fsType string) error {
    mountInfo := &volume.MountInfo{
        VolumeType: "block",
        Device:     device,
        FsType:     fsType,
    }

    mi, err := json.Marshal(mountInfo)
    if err != nil {
        klog.Errorf("addDirectVolume - json.Marshal failed: ", err.Error())
        return status.Errorf(codes.Internal, "json.Marshal failed: %s", err.Error())
    }

    if err := volume.Add(volumePath, string(mi)); err != nil {
        klog.Errorf("addDirectVolume - add direct volume failed: ", err.Error())
        return status.Errorf(codes.Internal, "add direct volume failed: %s", err.Error())
    }

    klog.Infof("add direct volume done: %s%s", volumePath, string(mi))
    return nil
}

//  NodeUnpublishVolume 中remove掉
	if err := volume.Remove(targetPath); err != nil {
		log.Errorf("NodeUnpublishVolume: kata direct volume remove failed: %s", err.Error())
	}
- 通过
kata-runtime CLI命令传递mountinfo.json信息:
$ kata-runtime direct-volume add --volume-path [volumePath] --mount-info [mountinfo.json]

$ kata-runtime direct-volume remove --volume-path [volumePath] --mount-info [mountinfo.json]
最后会在容器所在 host 的 /run/kata-containers/shared/direct-volumes/volume-path(base64加密)/ 目录下生成 mountinfo.json 文件,然后 Kata Containers 会在启动容器时检查该目录是否有 mountinfo.json 文件并解析该文件,同时更新容器 spec 中 mount 信息,将直通卷的信息加入进去,然后将修改后的 spec 传给 kata-agent;
方案限制:
- 使用
direct volume方式的PV只能给一个Pod使用,所以在创建PVC时需要指定accessMode为ReadWriteOnce - 使用
direct volume方式不支持更高级的volume功能,比如:fsGroup、fsGroupChangePolicy和subPath
未来:kata 联动 kubelet/kube-apiserver,实现CSI 卷的运行时辅助挂载
社区未通过的最终方案:KEP-2857:持久卷的运行时辅助安装
Demo
---
apiVersion: v1
kind: Pod
metadata:
  name: app
spec:
  runtime-class: kata-qemu  # 方式一:通过设置runtime-class,使用kata 运行时; 其下面的卷都是直通卷
  containers:
  - name: app
    image: centos
    command: ["/bin/sh"]
    args: ["-c", "while true; do echo $(date -u) >> /data/out.txt; sleep 5; done"]
    volumeMounts:
    - name: persistent-storage
      mountPath: /data
  volumes:
  - name: persistent-storage
    persistentVolumeClaim:
      claimName: ebs-claim
---
apiVersion: v1
kind: PersistentVolumeClaim
metadata:
  annotations:
    skip-hostmount: "true"  # 方式二:通知csi为卡通直通卷
  name: ebs-claim
spec:
  accessModes:
    - ReadWriteOncePod
  volumeMode: Filesystem
  storageClassName: ebs-sc
  resources:
    requests:
      storage: 1Gi
---
kind: StorageClass
apiVersion: storage.k8s.io/v1
metadata:
  name: ebs-sc
provisioner: ebs.csi.aws.com # 方式三:特定的csi driver实现 kata direct assigned volume
volumeBindingMode: WaitForFirstConsumer
parameters:
  csi.storage.k8s.io/fstype: ext4
11 - Kubernetes Pod进本地磁盘(local,disk,LVM) 进行流量控制
一. 继承上一章节
混合云场景业务Pod直接相互干扰 、 在离线混部(在离线服务同时在一台机器上服务用户) 等场景下,除了对cpu、mem、fd、inode、pid等进行隔离,还需要对 网络带宽bandwidth、磁盘读写速度IPOS、NBD IO、L3 Cache、内存带宽MBA 等都需要做到隔离和限制
因此,本章节介绍下 磁盘读写速度IPOS 的使用和实现
二. Kubernetes 具体使用和实现
Kube-apiserver控制
PersistentVolume(PV)是 持久存储卷,集群级别资源。PersistentVolumeClaim(PVC)是持久存储卷声明,namespace级别资源。 是用户对使用存储卷的使用需求声明
apiVersion: v1
kind: PersistentVolumeClaim
metadata:
  name: test
  namespace: test
spec:
  accessModes:
  - ReadWriteMany
  resources:
    requests:
      storage: 10Gi
  storageClassName: csi-cephfs-sc
  volumeMode: Filesystem
StorageClass是创建PV模板信息, 集群级别,用于动态创建pv
apiVersion: storage.k8s.io/v1
kind: StorageClass
metadata:
  name: csi-rbd-sc
parameters:
  clusterID: ceph01
  imageFeatures: layering
  imageFormat: "2"
  mounter: rbd
  pool: kubernetes
provisioner: rbd.csi.ceph.com
reclaimPolicy: Delete
volumeBindingMode: Immediate
VolumeAttachment记录了pv的相关挂载信息,如挂载到哪个node节点,由哪个volume plugin来挂载等。AD Controller创建一个VolumeAttachment,而External-attacher则通过观察该VolumeAttachment,根据其状态属性来进行存储的挂载和卸载操作。
apiVersion: storage.k8s.io/v1
kind: VolumeAttachment
metadata:
  name: csi-123456
spec:
  attacher: cephfs.csi.ceph.com
  nodeName: 172.1.1.10
  source:
    persistentVolumeName: pvc-123456
status:
  attached: true
CSINode是记录csi plugin的相关信息(如nodeId、driverName、拓扑信息等). 当Node Driver Registrar向kubelet注册一个csi plugin后,会创建(或更新)一个CSINode对象,记录csi plugin的相关信息。
apiVersion: storage.k8s.io/v1
kind: CSINode
metadata:
  name: 172.1.1.10
spec:
  drivers:
  - name: cephfs.csi.ceph.com
    nodeID:  172.1.1.10
    topologyKeys: null
  - name: rbd.csi.ceph.com
    nodeID:  172.1.1.10
    topologyKeys: null
CSI Volume Plugin
扩展各种存储类型的卷的管理能力,实现第三方存储的各种操作能力与k8s存储系统的结合。调用第三方存储的接口或命令,从而提供数据卷的创建/删除、attach/detach、mount/umount的具体操作实现,可以认为是第三方存储的代理人。前面分析组件中的对于数据卷的创建/删除、attach/detach、mount/umount操作,全是调用volume plugin来完成。
csi plugin: csi plugin分为ControllerServer与NodeServer,各负责不同的存储操作。external plugin: 负责watch pvc、volumeAttachment等对象,然后调用volume plugin来完成存储的相关操作Node-Driver-Registrar: 负责实现csi plugin(NodeServer)的注册,让kubelet感知csi plugin的存在
kube-controller-manager
PV controller: 负责pv、pvc的绑定与生命周期管理(如创建/删除底层存储,创建/删除pv对象,pv与pvc对象的状态变更)。AD controller: 负责创建、删除VolumeAttachment对象,并调用volume plugin来做存储设备的Attach/Detach操作(将数据卷挂载到特定node节点上/从特定node节点上解除挂载),以及更新node.Status.VolumesAttached等。
注意 AD controller的Attach/Detach操作只是修改VolumeAttachment对象的状态,而不会真正的将数据卷挂载到节点/从节点上解除挂载,真正的节点存储挂载/解除挂载操作由kubelet中volume manager调用csi plugin来完成。
kubelet
管理卷的Attach/Detach(与AD controller作用相同,通过kubelet启动参数控制哪个组件来做该操作)、mount/umount等操作。
对于csi来说,volume manager的Attach/Detach操作只创建/删除VolumeAttachment对象,而不会真正的将数据卷挂载到节点/从节点上解除挂载;csi-attacer组件也不会做挂载/解除挂载操作,只是更新VolumeAttachment对象,真正的节点存储挂载/解除挂载操作由kubelet中volume manager调用调用csi plugin来完成。
三、磁盘限速 通用方式
本身Volume 限制分为两类:
本地磁盘/类本地磁盘: 类似于lvm,local disk,NAS云盘,底层通过底层Linux的xfs、ext4、Btrfs底层文件系统接口,进行通信,实现操作存储,从而提供容器存储服务。远程目录: 类似与S3、NFS等远程目录mount到pod; 底层是通过kubernetes通过grpc接口与存储卷插件系统进行通信,来操作存储,从而提供容器存储服务。
因此当前业绩通用作为,只能对本地磁盘/类本地磁盘, 通过blkio的cgroup subsystem进行限速.
方式一:Runtime 运行时层面限制
dongjiangdeMacBook-Pro:~ $ docker help run | grep -E 'bps|IO'
Usage:  docker run [OPTIONS] IMAGE [COMMAND] [ARG...]
      --blkio-weight uint16            Block IO (relative weight), between 10 and 1000, or 0 to disable (default 0)
      --blkio-weight-device list       Block IO weight (relative device weight) (default [])
      --device-read-bps list           Limit read rate (bytes per second) from a device (default [])
      --device-read-iops list          Limit read rate (IO per second) from a device (default [])
      --device-write-bps list          Limit write rate (bytes per second) to a device (default [])
      --device-write-iops list         Limit write rate (IO per second) to a device (default [])
通过kubelet 内置dockershim, 解析 pod的annotaion,将 配置设置到blkio配置中
# Pod
apiVersion: v1
kind: Pod
metadata:
  name: xxxx
  annotations:
    io.kubernetes.container.blkio: '{"weight":200,"weight_device":[{"device":"rootfs","value":"200k"}],"device_read_bps":[{"device":"/dev/sda1","value":"20m"}],"device_write_bps":[{"device":"rootfs","value":"20m"}],"device_read_iops":[{"device":"rootfs","value":"200"}]"device_write_iops":[{"device":"rootfs","value":"300"}]}'
...
优势:
a. 不仅仅支持容器卷volume,对pod本身 rootfs等都可以进行设置;
缺点:
a. Container Runtime必须是docker;
b. 不能根据创建pvc生命周期,自动进行配置;
c. 仅支持对于direct本地磁盘生效;
d. 对于一写多读的 多个pod共享的本地卷,设置是后者覆盖前者
代码解析:
// +build linux
// 只是对liunx系统生效
func UpdateBlkio(containerId string, docker libdocker.Interface) (err error) {
	info, err := docker.InspectContainer(containerId) //获得docker inspect info

	blkio := Blkio{}
	err = json.Unmarshal([]byte(blkiolable), &blkio) //添加blkio设置
	if err != nil {
		return fmt.Errorf("failed to unmarshal blkio config,%s, sandboxID:%s, containerId:%s", err.Error(), sandboxID, containerId)
	}

	//...
	blkioResource, err := getBlkioResource(&blkio, containerRoot) //获得 blkioResource object
	if err != nil {
		return fmt.Errorf("getBlkioResource failed. sandboxID:%s, containerId:%s, %v", sandboxID, containerId, err.Error())
	}

	cg := &configs.Cgroup{
		Path:      cpath,
		Resources: &blkioResource,
	}
	err = blkioSubsystem.Set(cpath, cg)  // blkio设置到cgroup
	if err != nil {
		return fmt.Errorf("blkioSubsystem.Set failed. sandboxID:%s, containerId:%s, %v", sandboxID, containerId, err.Error())
	}
	glog.V(4).Infof("set Blkio cgroup success. sandboxID:%s, containerId:%s, cgroup path:%v, cgroup:%+v", sandboxID, containerId, cpath, cgroupToString(cg))
	return nil
}
**总结:**目前这情况对本地卷各种缺点局限性,对kubelet源码级别侵害比较大;
方式二:Pod 卷中 blkio 添加与设置
在kubelet 开启feature. 比如: PVCQos=true, 可以通过如下注解添加 pod qos。
# Pod
apiVersion: v1
kind: Pod
metadata:
  name: xxxx
  annotations:
    qos.volume.storage.cloud.cmss.com: >-
        {"pvc": "snap-03", "iops": {"read": 2000, "write": 1000}, "bps":
        {"read": 1000000, "write": 1000000}}
...
再通过kubelet就可以得到pvc的挂载点和设备id。然后我们使用 cgroup 来限制 pod 的 iops 和 bps。
我们可以只编辑 pod /sys/fs/cgroup/blkio/kubepods/pod/<Container_ID>/... 下的 cgroup 限制文件,
例如,限制 pod 的读取 iops:
echo "<block_device_maj:min> <value>" > /sys/fs/cgroup/blkio/kubepods/pod<UID>/blkio.throttle.read_iops_device
优势:
a. 用户可以使用任何容器运行时
b. k8s的方式,用户必须知道 pod 的 pv。
缺点:
a. pod使用的rootfs的限制不支持;(当您节点中的一个 pod 大量使用 rootfs 时,可能会影响同一节点上的其他 pod。)
b. 只能对本地磁盘生效;
c. 对于一写多读的 多个pod共享的本地卷,设置是后者覆盖前者;
此方法明显好一些,但是blkio不能对外挂目录生效;并且对于共享的Volume (N个Pod中的不同container共享一个卷),配置在pod层面不合适
方案三: 基于CSI PVC和StorageClass进行 本地卷设置
集合以上两种方式,限制支持范围:
a. 仅支持本地磁盘/类本地磁盘 的iops;
b. 通过csi插件方式实现,不更改kubelet;
c. 配置在PVC和StorageClass, 以整个pv的生命周期做限制,不限制在pod和container层面;
d. 仅对pvc生效,不对pod本身rootfs做限流(rootfs 本身就是静态数据,不建议做存储和数据平凡读写);
在这个前提下实现io的blkio读写限制。
先通过storageclass.yaml设置pv模版
apiVersion: storage.k8s.io/v1
kind: StorageClass
metadata:
    name: csi-local
provisioner: local.csi.cmsss.com
parameters:
    volumeType: LVM
    vgName: volumegp
    fsType: ext4
    lvmType: "striping"
    readBPS: 1M  # read 此类卷的带宽是1MB/s
    writeBPS: 100K # 写 此类卷的带宽是100KB/s
    readIOPS: 2000  # read 此类卷的tps是2000
    writeIOPS: 1000  # write 此类卷的tps是1000
reclaimPolicy: Delete
volumeBindingMode: WaitForFirstConsumer
allowVolumeExpansion: true
也可以支持pmem和QuotaPath的volumeType
再通过persistentVolumeClaim.yaml申请具体pv:
apiVersion: v1
kind: PersistentVolumeClaim
metadata:
  name: lvm-pvc
spec:
  accessModes:
  - ReadWriteOnce
  resources:
    requests:
      storage: 2Gi
  storageClassName: csi-local
最后通过 deployment.yaml 挂载符合的pv :
apiVersion: apps/v1
kind: Deployment
metadata:
  name: deployment-lvm
  labels:
    app: nginx
spec:
  selector:
    matchLabels:
      app: nginx
  template:
    metadata:
      labels:
        app: nginx
    spec:
      containers:
      - name: nginx
        image: nginx:1.15.4
        volumeMounts:
          - name: lvm-pvc
            mountPath: "/data"
      volumes:
        - name: lvm-pvc
          persistentVolumeClaim:
            claimName: lvm-pvc
优势在于: 对于pv的模版 添加 iops和bps配置, 可以动态生效pvc整个生命周期。
四、总结
-
- 以支持任何容器运行时;
-
- 支持本地不同pv的限速,保证整个pv生命周期的限制不被更改;
-
- 在社区原生应用不支持情况下,可以不破坏
kubernetes生态实现;
- 在社区原生应用不支持情况下,可以不破坏
-
- 对于
一写多读的 多个pod共享的本地卷,pv速率限制整个生命周期有效;
- 对于
特别说明下:
使用内置(in-tree) 卷 , 不支持 限流. 这一类的卷比如: empty、 hostpath 等
最核心原因是: blkio 只能对 direct 读写请求生效
五、具体实现方式
对 csi 的 nodeserver 创建 pvc 过程中, 使用具体的storageclass, 实现本地卷 VolumeIOLimit
func SetVolumeIOLimit(devicePath string, req *csi.NodePublishVolumeRequest) error {
	readIOPS := req.VolumeContext["readIOPS"]
	writeIOPS := req.VolumeContext["writeIOPS"]
	readBPS := req.VolumeContext["readBPS"]
	writeBPS := req.VolumeContext["writeBPS"]

	// IOlimit 值解析
	readBPSInt, err := getBpsLimt(readBPS)
	if err != nil {
		log.Errorf("Volume(%s) Input Read BPS Limit format error: %s", req.VolumeId, err.Error())
		return err
	}
	writeBPSInt, err := getBpsLimt(writeBPS)
	if err != nil {
		log.Errorf("Volume(%s) Input Write BPS Limit format error: %s", req.VolumeId, err.Error())
		return err
	}
	readIOPSInt := 0
	if readIOPS != "" {
		readIOPSInt, err = strconv.Atoi(readIOPS)
		if err != nil {
			log.Errorf("Volume(%s) Input Read IOPS Limit format error: %s", req.VolumeId, err.Error())
			return err
		}
	}
	writeIOPSInt := 0
	if writeIOPS != "" {
		writeIOPSInt, err = strconv.Atoi(writeIOPS)
		if err != nil {
			log.Errorf("Volume(%s) Input Write IOPS Limit format error: %s", req.VolumeId, err.Error())
			return err
		}
	}

	// 获得 Device major/minor 值
	majMinNum := getMajMinDevice(devicePath)
	if majMinNum == "" {
		log.Errorf("Volume(%s) Cannot get major/minor device number: %s", req.VolumeId, devicePath)
		return errors.New("Volume Cannot get major/minor device number: " + devicePath + req.VolumeId)
	}

	// 获得pod uid
	podUID := req.VolumeContext["csi.storage.k8s.io/pod.uid"]
	if podUID == "" {
		log.Errorf("Volume(%s) Cannot get poduid and cannot set volume limit", req.VolumeId)
		return errors.New("Cannot get poduid and cannot set volume limit: " + req.VolumeId)
	}
	// 写具体的pod blkio文件
	podUID = strings.ReplaceAll(podUID, "-", "_")
	podBlkIOPath := filepath.Join("/sys/fs/cgroup/blkio/kubepods.slice/kubepods-besteffort.slice", "kubepods-besteffort-pod"+podUID+".slice")
	if !IsHostFileExist(podBlkIOPath) {
		podBlkIOPath = filepath.Join("/sys/fs/cgroup/blkio/kubepods.slice/kubepods-burstable.slice", "kubepods-besteffort-pod"+podUID+".slice")
	}
	if !IsHostFileExist(podBlkIOPath) {
		log.Errorf("Volume(%s), Cannot get pod blkio/cgroup path: %s", req.VolumeId, podBlkIOPath)
		return errors.New("Cannot get pod blkio/cgroup path: " + podBlkIOPath)
	}

	// 设置具体pod blkio文件值
	if readIOPSInt != 0 {
		err := writeIoLimit(majMinNum, podBlkIOPath, "blkio.throttle.read_iops_device", readIOPSInt)
		if err != nil {
			return err
		}
	}
	if writeIOPSInt != 0 {
		err := writeIoLimit(majMinNum, podBlkIOPath, "blkio.throttle.write_iops_device", writeIOPSInt)
		if err != nil {
			return err
		}
	}
	if readBPSInt != 0 {
		err := writeIoLimit(majMinNum, podBlkIOPath, "blkio.throttle.read_bps_device", readBPSInt)
		if err != nil {
			return err
		}
	}
	if writeBPSInt != 0 {
		err := writeIoLimit(majMinNum, podBlkIOPath, "blkio.throttle.write_bps_device", writeBPSInt)
		if err != nil {
			return err
		}
	}
	log.Infof("Seccessful Set Volume(%s) IO Limit: readIOPS(%d), writeIOPS(%d), readBPS(%d), writeBPS(%d)", req.VolumeId, readIOPSInt, writeIOPSInt, readBPSInt, writeBPSInt)
	return nil
}
自测验证
配置要求
具有所需 RBAC 权限的服务帐户
功能状态
编译打包
local.csi.ecloud.cmss.com 可以编译成容器的形式。
构建容器:
$ docker build -f hack/local/Dockerfile .
用法
先决条件
使用localdisk 或者 挂载clouddisk方式,挂载或生成 lvm pvcreate 或 lvm vgcreate
$ fdisk -l
Disk /dev/sdc: 68.7 GB, 68719476736 bytes, 134217728 sectors
Units = sectors of 1 * 512 = 512 bytes
Sector size (logical/physical): 512 bytes / 512 bytes
I/O size (minimum/optimal): 512 bytes / 512 bytes

$ fdisk /dev/sdc
Command (m for help): p

Disk /dev/sdc: 68.7 GB, 68719476736 bytes, 134217728 sectors
Units = sectors of 1 * 512 = 512 bytes
Sector size (logical/physical): 512 bytes / 512 bytes
I/O size (minimum/optimal): 512 bytes / 512 bytes
Disk label type: dos
Disk identifier: 0x72a4d30c

   Device Boot      Start         End      Blocks   Id  System

Command (m for help): n
Partition type:
   p   primary (0 primary, 0 extended, 4 free)
   e   extended
Select (default p): p
Partition number (1-4, default 1): 1
First sector (2048-134217727, default 2048):
Using default value 2048
Last sector, +sectors or +size{K,M,G} (2048-134217727, default 134217727): 64217727
Partition 1 of type Linux and of size 30.6 GiB is set

Command (m for help): t
Selected partition 1
Hex code (type L to list all codes): 8e
Changed type of partition 'Linux' to 'Linux LVM'

Command (m for help): w
The partition table has been altered!

$ lsblk
NAME   MAJ:MIN RM  SIZE RO TYPE MOUNTPOINT
sdb      8:16   0  100G  0 disk
|-sdb4   8:20   0   25G  0 part
`-sdb2   8:18   0   75G  0 part
sr0     11:0    1  506K  0 rom
sdc      8:32   0   64G  0 disk
`-sdc1   8:33   0 30.6G  0 part
sda      8:0    0  100G  0 disk
`-sda1   8:1    0  100G  0 part /

$ pvcreate /dev/sdc1
  Physical volume "/dev/sdc1" successfully created.
$ vgcreate volumegroup1 /dev/sdc1
  Volume group "volumegroup1" successfully created
$ vgdisplay
  --- Volume group ---
  VG Name               volumegroup1
  System ID
  Format                lvm2
  Metadata Areas        1
  Metadata Sequence No  2
  VG Access             read/write
  VG Status             resizable
  MAX LV                0
  Cur LV                1
  Open LV               1
  Max PV                0
  Cur PV                1
  Act PV                1
  VG Size               <30.62 GiB
  PE Size               4.00 MiB
  Total PE              7838
  Alloc PE / Size       512 / 2.00 GiB
  Free  PE / Size       7326 / <28.62 GiB
  VG UUID               V6TVTh-AcIi-hLmR-bozc-9QeA-EBnU-Mhhd6y
执行步骤
第 1 步:创建 CSI Provisioner
$ kubectl create -f ./deploy/local/provisioner.yaml
第 2 步:创建 CSI 插件
$ kubectl create -f ./deploy/local/plugin.yaml
第 3 步:创建存储类
$ kubectl create -f ./examples/storageclass.yaml
apiVersion: storage.k8s.io/v1
kind: StorageClass
metadata:
   name: csi-lvm
provisioner: local.csi.ecloud.cmss.com
parameters:
    vgName: volumegroup1
    fsType: ext4
    pvType: localdisk
    nodeAffinity: "false"
    readIOPS: "2000"
    writeIOPS: "1000"
    readBPS: "10000"
    writeBPS: "5000"
reclaimPolicy: Delete
用法:
-
vgName:定义存储类的卷组名;
-
fsType:默认为ext4,定义lvm文件系统类型,支持ext4、ext3、xfs;
-
pvType:可选,默认为云盘。定义使用的物理磁盘类型,支持clouddisk、localdisk;
-
nodeAffinity:可选,默认为 true。决定是否在 PV 中添加 nodeAffinity。 —-> true:默认,使用 nodeAffinity 配置创建 PV; —-> false:不配置nodeAffinity创建PV,pod可以调度到任意节点
-
volumeBindingMode:支持 Immediate/WaitForFirstConsumer —-> Immediate:表示将在创建 pvc 时配置卷,在此配置中 nodeAffinity 将可用; —-> WaitForFirstConsumer:表示在相关的pod创建之前不会创建volume;在配置中,nodeAffinity 将不可用;
第 4 步:使用 lvm 创建 nginx 部署
$ kubectl create -f ./examples/pvc.yaml
$ kubectl create -f ./examples/deploy.yaml
第 5 步:检查 PVC/PV 的状态
$ kubectl get pvc
NAME      STATUS   VOLUME                                     CAPACITY   ACCESS MODES   STORAGECLASS   AGE
lvm-pvc   Bound    lvm-29def33c-8dae-482f-8d64-c45e741facd9   2Gi        RWO            csi-lvm        3h37m

$ kubectl get pv
NAME                                       CAPACITY   ACCESS MODES   RECLAIM POLICY   STATUS   CLAIM             STORAGECLASS   REASON   AGE
lvm-29def33c-8dae-482f-8d64-c45e741facd9   2Gi        RWO            Delete           Bound    default/lvm-pvc   csi-lvm                 3h38m
第 6 步:检查 pod 的状态
- 检查 pod 中的目录
$ kubectl get pod | grep deployment-lvm
deployment-lvm-57bc9bcd64-j7r9x   1/1     Running   0          77s

$ kubectl exec -ti deployment-lvm-57bc9bcd64-j7r9x   sh
kubectl exec [POD] [COMMAND] is DEPRECATED and will be removed in a future version. Use kubectl exec [POD] -- [COMMAND] instead.
# df -h | grep data
/dev/mapper/volumegroup1-lvm--9e30e658--5f85--4ec6--ada2--c4ff308b506e  2.0G  6.0M  1.8G   1% /data
- 检查主机中的目录:
$ kubectl describe pod deployment-lvm-57bc9bcd64-j7r9x | grep Node:
Node:         kcs-cpu-test-m-8mzmj/172.16.0.67

$ ifconfig | grep 172.16.0.67
        inet 172.16.0.67  netmask 255.255.0.0  broadcast 172.16.255.255

$ mount | grep volumegroup
/dev/mapper/volumegroup1-lvm--9e30e658--5f85--4ec6--ada2--c4ff308b506e on /var/lib/kubelet/pods/c06d5521-3d9c-4517-bdc2-e6df34b9e8f1/volumes/kubernetes.io~csi/lvm-9e30e658-5f85-4ec6-ada2-c4ff308b506e/mount type ext4 (rw,relatime,data=ordered)
/dev/mapper/volumegroup1-lvm--9e30e658--5f85--4ec6--ada2--c4ff308b506e on /var/lib/paascontainer/kubelet/pods/c06d5521-3d9c-4517-bdc2-e6df34b9e8f1/volumes/kubernetes.io~csi/lvm-9e30e658-5f85-4ec6-ada2-c4ff308b506e/mount type ext4 (rw,relatime,data=ordered)
- 检查pod disk iops和bps设置,是否生效:
$ pwd
/sys/fs/cgroup/blkio/kubepods.slice/kubepods-besteffort.slice/kubepods-besteffort-podc06d5521_3d9c_4517_bdc2_e6df34b9e8f1.slice

$ cat blkio.throttle.read_bps_device
253:1 10000
$ cat blkio.throttle.write_bps_device
253:1 5000
$ cat blkio.throttle.write_iops_device
253:1 1000
$ cat blkio.throttle.read_iops_device
253:1 2000
六、未来
期待下,k8s 对 cgroup v2, 核心支持了 读对于每一个pod中的container限速 和 对于远端目录 的 GRPC 请求限速
目前1.25版本中对cgroup v2 已经达到beta状态,期待它release状态 😄
七、下一章节
12 - Kubernetes Namespace 和 Node 做亲和部署
背景
在共享集群(多租户共享底层硬件资源)中, 遇到特殊租户需要独享特定资源(比如:独占GPU资源、独占Node节点等)时候,可以对namespace下的Pod请求统一做亲和性操作
Kubernetes 具体使用和实现
kubernetes中,最最核心部署通通过: Pod节点亲和性Affinity 和 Pod污点Taint和容忍度Toleration 组合方式实现 Pod真实部署在具体那个Node上
节点亲和性Affinity
亲和性主要分为两类:nodeAffinity和podAffinity
nodeSelector
Label是kubernetes中一个非常重要的概念,用户可以非常灵活的利用 label 来管理集群中的资源,比如最常见的一个就是 service 通过匹配 label 去选择 POD 的。而 POD 的调度也可以根据节点的 label 进行特定的部署。
$ kubectl label nodes docker-desktop key=value
node/docker-desktop labeled

$ kubectl get nodes --show-labels
NAME             STATUS   ROLES                  AGE    VERSION   LABELS
docker-desktop   Ready    control-plane,master   109d   v1.22.5   beta.kubernetes.io/arch=amd64,beta.kubernetes.io/os=linux,key=value,kubernetes.io/arch=amd64,kubernetes.io/hostname=docker-desktop,kubernetes.io/os=linux,node-role.kubernetes.io/control-plane=,node-role.kubernetes.io/master=,node.kubernetes.io/exclude-from-external-load-balancers=
可以对Pod进行nodeSelector亲和性部署
apiVersion: v1
kind: Pod
metadata:
  labels:
    app: busybox
  name: test
spec:
  containers:
  - command:
    - sleep
    - "1d"
    image: busybox
    name: test
  nodeSelector:
    # 通过nodeSelector强制进行亲和部署,对于有 key: value label的node没有资源等限制,Pod会直接失败
    key: value
nodeSelector的方式比较直观,但是还够灵活,控制粒度偏大
nodeAffinity
nodeAffinity就是节点亲和性, 可以进行一些简单的逻辑组合了,不只是简单的相等匹配.
nodeAffinity调度可以分成软策略和硬策略两种方式.
软策略就是如果你没有满足调度要求的节点的话,POD 就会忽略这条规则,继续完成调度过程,说白了就是满足条件最好了,没有的话也无所谓了的策略;硬策略就比较强硬了,如果没有满足条件的节点的话,就不断重试直到满足条件为止,简单说就是你必须满足我的要求,不然我就不干的策略。
apiVersion: v1
kind: Pod
metadata:
  name: node-affinity
  labels:
    app: node-affinity-test
spec:
  containers:
  - name: node-affinity
    image: nginx
  affinity:
    nodeAffinity:
      requiredDuringSchedulingIgnoredDuringExecution: # 硬策略
        nodeSelectorTerms:
        - matchExpressions:
          - key: kubernetes.io/os
            operator: In  #可以有 In、NotIn、Gt、Lt、Exists、DoesNotExist
            values:
            - Linux
        - matchExpressions:
          - key: kubernetes.io/os
            operator: In
            values:
            - Window
      preferredDuringSchedulingIgnoredDuringExecution:  # 软策略
      - weight: 1
        preference:
          matchExpressions:
          - key: key
            operator: In
            values:
            - value
            - value1
如果
nodeSelectorTerms下面有多个选项的话,满足任何一个条件就可以了;如果matchExpressions有多个选项的话,则必须同时满足这些条件才能正常调度POD
污点Taint和容忍度Toleration
Taint在一类服务器上打上污点,让不能容忍这个污点的Pod不能部署在打了污点的服务器上。(锁)
Toleration是让Pod容忍节点上配置的污点,可以让一些需要特殊配置的Pod能够调用到具有污点和特殊配置的节点上。(钥匙)
污点Taint
Taint Effect 对 Node 打 Label 包括以下3种:
NoSchedule:禁止调度到该节点,已经在该节点上的Pod不受影响
NoExecute:禁止调度到该节点,如果不符合这个污点,会立马被驱逐(或在一段时间后驱逐,默认300s,可单独设置驱逐时间)
PreferNoSchedule:尽量避免将Pod调度到指定的节点上,如果没有更合适的节点,可以部署到该节点
$ kubectl get node
NAME             STATUS   ROLES                  AGE    VERSION
docker-desktop   Ready    control-plane,master   109d   v1.22.5

$ kubectl taint nodes docker-desktop key=value:PreferNoSchedule
node/docker-desktop tainted

$ kubectl get node docker-desktop -o go-template --template {{.spec.taints}}
[map[effect:PreferNoSchedule key:key value:value]]
对Node打了基于key=value的PreferNoSchedule类型污点
容忍度Toleration
容忍度Toleration 就是Pod对 Node Taints的选择关系
- 完全匹配
tolerations:
- key: "keu"
  operator: "Equal"
  value: "value"
  effect: "PreferNoSchedule"
- 不完全匹配
tolerations:
- key: "key"
  operator: "Exists"
  effect: "PreferNoSchedule"
  tolerationSeconds: 600 # 节点不健康,600秒后再驱逐
- node.kubernetes.io/not-ready:节点未准备好,相当于节点状态Ready的值为False
- node.kubernetes.io/unreachable:Node Controller访问不到节点,相当于节点状态Ready的值为Unknown
- node.kubernetes.io/out-of-disk:节点磁盘耗尽
- node.kubernetes.io/memory-pressure:节点存在内存压力
- node.kubernetes.io/disk-pressure:节点存在磁盘压力
- node.kubernetes.io/network-unavailable:节点网络不可达
Namespace 和 Node 做亲和部署设计
首先,对于特定的Namespace 通过 Label, 通过namespace-node-affinity: enabled进行开启。
apiVersion: v1
kind: Namespace
metadata:
  name: test-demo
  labels:
    # namespace级生效,对本namespace开启
    namespace-node-affinity: enabled
通过configmap对namespace下的亲和性最全局配置
apiVersion: v1
kind: ConfigMap
metadata:
  name: namespace-node-affinity-webhook
  namespace: kube-system  # 这个namespace是 webhook所在的namespace
data:
  # namespace 名称: test-demo、default
  setting-namespace-name: |
    nodeSelectorTerms:  #做 nodeAffinity 下的 硬策略
      - matchExpressions:
        - key: "kubernetes.io/os"
          operator: In
          values:
          - "linux"
    tolerations:  #做 tolerations 策略
      - key: "example-key"
        operator: "Exists"
        effect: "NoSchedule"
    excludedLabels:  #如果匹配其中全部key-value 可跳过强绑定
      namespace-node-affinity.cmss.com: disabled
对于Pod和Deployment, 可以通过统一标签,跳过以上白名单,namespace-node-affinity.cmss.com: disabled
# Pod
apiVersion: v1
kind: Pod
metadata:
  name: xxxx
  annotations:
    namespace-node-affinity.cmss.com: disabled
...


# Deployment
...
 spec:
  template:
    metadata:
      #添加注解
      annotations:
        namespace-node-affinity.cmss.com: disabled
...
逻辑: 通过webhook监听Pod的Create事件,如果监听到事件后,先判断Pod中是否有亲和性策略,并且判断namespace的 node亲和性是否开启,
如果都开启,将亲和性指令merge一起
//...
func buildNodeSelectorTermsPath(podSpec coreV1.PodSpec) PatchPath {
	var path PatchPath
	//pod没有亲和性设置
	if podSpec.Affinity == nil {
		path = CreateAffinity
	} else if podSpec.Affinity != nil && podSpec.Affinity.NodeAffinity == nil { //pod有亲和性设置,但是没有NodeAffinity
		path = CreateNodeAffinity
	} else if podSpec.Affinity.NodeAffinity != nil && podSpec.Affinity.NodeAffinity.RequiredDuringSchedulingIgnoredDuringExecution == nil { //pod有亲和性设置,且有NodeAffinity,但是没有强策略
		path = AddRequiredDuringScheduling
	} else {
		path = AddNodeSelectorTerms
	}

	return path
}
//...
func buildTolerationsPath(podSpec coreV1.PodSpec) PatchPath {
	// pod是否有Tolerations
	if podSpec.Tolerations == nil {
		return CreateTolerations
	}
	return AddTolerations
}
13 - 基于blackbox构建的Pingmesh体系
背景
数据中心自身是极为复杂的,其中网络涉及到的设备很多就显得更为复杂,一个大型数据中心都有成百上千的节点、网卡、交换机、路由器以及无数的网线、光纤。在这些硬件设备基础上构建了很多软件,比如搜索引擎、分布式文件系统、分布式存储等等。在这些系统运行过程中,面临一些问题:如何判断一个故障是网络故障?如何定义和追踪网络的 SLA?出了故障如何去排查?
网络性能数据监控 就比较困难实现。 如果单纯直接使用 ping 命令收集结果,每台服务器去 ping 剩下 (N-1) 台,也就是 N^2 的复杂度,稳定性和性能都存在一些问题。
举个例子:
如果IDC中有10000台服务器,ping的任务就有,10000*9999 任务, 如果一台机器有多IP请求,结果再翻倍。
对于数据存储也是一个问题,如果是每30s进行一次ping, 一次ping 需要 payload大小是64bytes
数据存储量: 10000*9999*2*64*24*3600/30 = 3.6860314e+13 bytes = 33.52TB
是否只记录fail和timeout的记录,可以节约99.99%的存储空间
业界实现
本体系是基于微软Pingmesh论文一种增强实现.
原微软Pingmesh论文地址: 《Pingmesh: A Large-Scale System for Data Center Network Latency Measurement and Analysis》
对于微软Pingmesh是网络监控中一个很好突破。(具体可认真读原文)
但是在实际使用中也有不少局限性:
-
agent数据流: 对于
Agent每次ping完都是记录到log中,再通过基础设施进行log数据收集,使用日志分析系统加大了系统复杂性。 -
Ping 模式支持: 只能支持
UDP模式, 对于DNS tcp、ICMP ping等支持比较缺少。 -
Ping维度:只能支持
IPv4ping。 但很多场景需要支持 是否公网互联互通等domain/dnsping -
不支持手动实时尝试ping: 可基于
balckbox-exporter网络探测实现 -
不支持ipv6
Pingmesh升级后的架构
Controller
Controller 主要负责生成 pinglist.yaml 文件。 pinglist 的生成来源有3个方向:
通过
IP Controller自动获取到整个集群的podIP 和 nodeIp list
通过
Pinglist Controller活动Agent Setting配置
通过
Custom Define Pinglist在pinglist.yaml文件中补充 外部地址。 支持dns地址、外部http地址、domain地址、ntp地址、Kubenetes apiserver地址等等
Controller 在生成 pinglist 文件后,通过 HTTP/HTTPS 提供出去,Agent 会定期获取 pinglist 来更新 agent 自己的配置,也就是我们说的拉模式。Controller 需要保证高可用,因此需要在 Service 后面配置多个实例,每个实例的算法一致,pinglist 文件内容也一致,保证可用性
Agent
每个 ping 动作都开启一个新的连接,为了减少 Pingmesh 造成的 TCP 并发. 两个server ping 的周期最小是 10s,Packet 大小最大 64kb。
setting:
  # the maximum amount of concurrent to ping, uint
  concurrent_limit: 20
  # interval to exec ping in seconds, float
  interval: 60.0
  # The maximum delay time to ping in milliseconds, float
  delay: 200
  # ping timeout in seconds, float
  timeout: 2.0
  # send ip addr
  source_ip_addr: 0.0.0.0
  # send ip protocal
  ip_protocol: ip6

mesh:
  add-ping-public:
    name: ping-public-demo
    type: OtherIP
    ips :
      - 127.0.0.1
      - 8.8.8.8
      - www.baidu.com
      - kubernetes.default.svc.cluster.local
并且做了过载保护
- 如果
pinglist中 数据很多, 在一个周期(比如10s)处理不完, 会保证本次处理完成后,在执行下一次, 优先一个轮回完成 - 配置可以设置
agent并发线程数,确保pingmesh agent对整个集群影响小于千分之一 - metrics中是通过
Promethrus Gauge, 在每个周期中单独计算
# HELP pingmesh_fail ping fail
# TYPE pingmesh_fail gauge
pingmesh_fail{target="8.8.8.8",tor="ping-public-demo"} 1

# HELP pingmesh_duration_milliseconds duration of ping rtt
# TYPE pingmesh_duration_milliseconds gauge
pingmesh_duration_milliseconds{target="docker.io",tor="ping-public-demo"} 245
- 为了确保 ping的请求在一个
时间窗口interval中平均发出, 对请求job 做了内存态计算,在并发协程上做了ratelimit
网络状况设计
通过pinglist.yaml设置中的interval时间窗口:
- 请求超过了
timeout时间, 将请求标记为ping_fail - 请求超过了
delay但没有超过timeout时间, 将请求标记为ping_duration_milliseconds - 请求没有超过
delay,在metrics接口中不记录
与promtheus集成
将以下文本添加到promtheus.yaml的scrape_configs部分, pingmeship为server的ip
scrape_configs:

  - job_name: net_monitor
    honor_labels: true
    honor_timestamps: true
    scrape_interval: 60s
    scrape_timeout: 5s
    metrics_path: /metrics
    scheme: http
    static_configs:
    - targets:
      - $pingmeship:9115
与监控grafana结合
14 - 基于wayne构建的Kubenetes 多集群管理平面 Basa
Basa (体验版) 是一个支持 Multi-cluster Kubernetes集群的 可视化管理平台, 通过直观的页面操作便可完成Kubernetes中资源的创建、部署等操作。
采用plugin架构,通过插件化的方式将不同功能尽量的分离,更利于各种定制化功能的扩展。
云平台体验版地址:https://play.kubeservice.cn
云平台体验版账号:kubeservice
云平台体验版地址:kubeservice
动机
业界已经有很好的Kubernetes集群管理平台比如:Kubesphere和Rancher, 也有很好的桌面工具Lens 都基于Kubernetes之上封装了接口和UI更方便开发者上手和部署
但是对于企业来说:上云/云原生改造 的初衷: 上线效率、成本核算、权限控制 和 企业内全部资源的管理 等维度
因此设计的核心点:
- 融入
部门、项目、模块概念: 通过RBAC的方式细化了资源控制的权限,适合建立企业内部的私有云平台; - 纳管多套集群:
pod,集群,命名空间等元数据自管理; 可快速纳管全部集群 - 权限
细力度控制: 除了kubeconfig和RBAC的访问权限外,平台按人员角色(管理员、部门负责人、项目负责人、开发人员、测试人员、运维人员等)设计不同权限;运维视角与研发视角隔离 FaaS能力: 方便业务方更好接入, 支持openFaaS Serverless无差别部署- 成本核算:
FinOps对部门、团队、项目级别资源可做到成本分摊 - 上线效率: 即支持
webssh通过kubectl apply部署 也支持 页面引导式 部署 - 报表: 数字化报表, 支持
部门、项目、模块的呈现 - 多集群、多租户能力:支持一键式发布不通集群,并可以动态
协同总发布实例数
目标
构建基于企业架构, 支持成本分摊 的多云管理平台. 服务好更好的企业级私有云平台
特性
- 支持多集群、多租户。支持K8s机器部署 和 多集群k8s集群纳管;
- 支持企业级别应用申请;
- 支持用户权限分类。支持项目管理员、项目负责人、项目成员、访客权限;
- 支持ldap登入;
- 保留完整的发布历史。支持历史发布、更改的回溯;
- 支持严密权限校验的webssh。用户可以通过 Web shell 的形式进入发布的 Pod 进行操作,自带完整的权限校验;
- 支持webhook通知:方便管理员推送集群、业务通知和故障处理报告等;
- 支持Serverless openFaaS 接入
- 支持 ingress 自动发现Pod 和 serverless function
架构
项目整体采用前后端分离的方案实现。
- 前端采用Angular框架进行数据交互和展示,使用Ace编辑器进行Kubernetes资源模版编辑
- 后端采用Beego框架做数据接口处理,持久层采用MySQL存储,使用client-go与Kubernetes进行交互
特点
图形化方式: 易用的Web管理界面,降低企业上云部署复杂度;基础设施编排: 支持以使用任何公有云或者私有云的Linux主机资源,也支持Kubernetes内部署;容器编排与调度: 支持Kubernetes 1.16.6 +所有版本企业级权限管理: 支持企业架构LDAP、Oauth2.0等认证方式,并支持对人员赋予不同执行权利;其他小特点: 基于模板复制workload;运维视角与研发视角隔离; 应用误删除回滚等等20+特性
使用
TODO
Helm应用商店 接入- 监控报警 通过
webhook报警 - 集群规划能力
欢迎大家加入 KubeServiceStack Community
Basa 开源工程地址: https://github.com/kubeservice-stack/basa
